Monday, February 28, 2011

Chicken Cutlets


I imagine most people have those familiar foods from their childhood, the ones that just make you happy. This is one of those dishes from mine.
My mom would make these chicken cutlets and they would always smell so wonderful cooking.  It is such a tender chicken that just melts in your mouth. I love the tiny pieces right out of the pan, still too hot to chew, and then the big pieces cut up the night of dinner.  Then there are the leftovers, which are fantastic cold, right out of the fridge, or put them on two thick pieces of Italian bread with a little mayo.  YUM!
So, from me to you, a little piece of my childhood that will make your taste buds sing!

CHICKEN CUTLETS

INGREDIENTS:
  • 3 large chicken breasts
  • 3 eggs
  • Italian bread crumbs 
  • parm cheese
  • garlic powder
  • oregano
  • white wine
  • butter

DIRECTIONS:

Slice chicken as thin as you can.  (Hint- freeze chicken for about 20-30 minutes before cutting.  Will cut easier if it is very cold) Some small pieces, no problem!  Those are wonderful to taste test while cooking!  One breast will make at least 5 thin slices.  Whisk eggs and place in shallow dish.  In another dish, place bread crumbs.  Mix in a handful of parm. cheese, a good sprinkle of granulated garlic and about 1 tsp of oregano into bread crumbs.
Preheat large nonstick skillet  over med/ med high heat, and put in about 2 tbsp butter in it.  Place chicken egg wash and then in bread crumbs and place in hot skillet.  Cook on one side until golden brown about 5-7 minutes and turn over.  Add pat of butter where ever the pan looks dry.  Cook another few minutes and pour about 1/2 c. wine over chicken.  Let wine simmer over chicken for 2-3 minutes and remove from pan and cover.  Cook remaining chicken in the same manner and serve hot.  (The second batch will probably need more butter than the first).

Baked BBQ Chicken


 After many nights of no meat, and pasta dishes, my husband was wanting something non vegetarian.  This hit the spot!  This chicken is delicious and tender, sweet and fall off the bone good.  A great quick prep meal, that is so simple, but delish!


BAKED BBQ CHICKEN

INGREDIENTS:
  • 1 bottle of favorite BBQ sauce
  • 1 c. brown sugar
  • 1 cup canola oil
  • 1 c. vinegar (apple cider or balsamic)
  • whole chicken cut up- skin on
DIRECTIONS:

Preheat oven to 325.  Place chicken in baking dish.  Mix other ingredients and pour over chicken.  Cover and bake for about 2 hours.  Uncover and bake another 15 min.  Serve hot.  Excellent with mashed potatoes (I put the sauce on like gravy).  Serve chicken with sauce over top. and extra BBQ sauce if desired.

NOTE:  I had 2 large breasts and 3 legs and halves the sauce and it was plenty.

Roasted Brussels Sprouts


If someone asked me if I liked brussels sprouts a week ago, I would surely wrinkle my nose and tell them no.  However, upon further reflection I realized I have never actually tasted one.  So,  I set out to make some.  Roasted, because everything tastes better that way.  I am now happy to say, I like brussels sprouts!

After roasting they take on a nutty flavor and are tender on the inside with a crunch on the outside.  So, if you think you don't like brussels sprouts, go out, get some and try this.  You may be surprised, as I was, to find you like them!


ROASTED BRUSSELS SPROUTS

INGREDIENTS:
  • extra virgin olive oil (EVOO)
  • salt and pepper
  • splash balsamic vinegar
  • container of brussels sprouts or 1.5 lbs


DIRECTIONS:
Preheat oven to 400.

Peel outer layer off brussels sprouts and cut off bottom and half.  Place in bowl and drizzle with evoo (couple tbsps), a heavy pinch of kosher salt, a grind of fresh pepper and a splash of balsamic vinegar.  Toss to coat and pour onto a baking sheet.  Place in preheated oven and bake 25-30 minutes, until brown and tender.  Could also add some garlic to roasting process and/or sprinkle with parm cheese at the end.

Baked Potato Soup


Another soup!  I am on a roll.  I made baked potatoes the other night when we had baked BBQ chicken so I made some extras with this soup in mind.  My husband said it stole the show for him.  My daughter ate at a friends birthday party but managed to eat an entire bowl of this no problem.

It is a delicious soup.  Not really for those watching their waistline.... but so good!  Major comfort food here.  It is like a baked potato in a bowl.  This will warm you up on a cold day and definitely will fill your belly. 


BAKED POTATO SOUP
from the kitchen of my cousin Michelle

INGREDIENTS:
  • 1 stick and 2 Tbsp. butter (about 2/3 cup)
  • 2/3 cup flour
  • 4 baked potatoes peeled and mashed chunky
  • 6 cups milk
  • salt and pepper
  • 1 1/2 cups light sour cream (I used half nonfat greek yogurt)
  • 1 cup shredded cheddar cheese, plus some for garnish
  • 4 scallions chopped
  • 1/2 cup bacon, cooked and crumbled
DIRECTIONS:

Cook bacon until very crispy (I used turkey bacon and cook in the microwave for about 1.5-2 min on paper towel lined paper plate).  Crumble and set aside.  Bake potato until done and peel (no big deal if few peels left behind).  Mash up, leaving some a bit chunky.


In large stock pot, melt butter and mix in flour to make roux.  Whisk and cook for 1 minute and slowly add milk, whisking until smooth.  Cook for about 15 min. over med heat, whisking so it doesn't burn.  It will get thick.  Season with salt and pepper and mix in potatoes, cheese, and sour cream.  Reduce heat to med. low.  Do not let boil.  If it gets too thick, you can thin it out with some more milk or chicken broth.
Heat for another few minutes until warm through and serve.  Garnish with the scallions, bacon and cheese.

Half Moon Cookies (Black and Whites)


These cookies are a New York thing.  They originated in Utica, NY and are frosted like this upstate.  In New York City, they are covered with black and white fondant and called black and whites.  There would probably be a fight between places whether they should be called half moons or black and whites, but I grew up upstate and called them half moons.  In both places they are a treat beyond compare! Often they are iced with a buttercream and a fudge chocolate on the other side.  I chose to use my Grandma's icing instead.
  http://delectabledelightswithrebecca.blogspot.com/search/label/frosting


These are basically a flat cupcake.  And if you are like me and can't decide which kind of frosting you prefer, they are perfect because they have both!  There is a chocolate variety as well, which maybe I will post someday down the road. 

These cookies are a fair amount of work.  It took me the better part of the afternoon to make them because I first made the frostings, then I had to bake the cookies and then frost them.  And of course sampling them took lots of time.   I am not sure where the recipe came from originally, but this is my Gramma's recipe.  I will post the halved version, because if you make the one I made, you will have like 60 cookies.  That is not necessarily a bad thing, if you are like my husband and are eating them for breakfast dessert, as well as lunch and dinner dessert.  But I personally, don't care to have 60 of these babies on my thighs.  I did make them smaller than the "originals" because I made them for a social event.  So, you can make them mini, or make them bigger which are about 5" across 
These cookies are tender, sweet and just plain delicious!


HALF MOON COOKIES (BLACK AND WHITES)
by: Bess Czyz


INGREDIENTS:
  • 2 cups AP flour
  • 1/2 tsp salt
  • 2 tsp. baking powder
  • 1 cup sugar
  • 1/2 cup crisco*
  • 1/2 cup milk
  • 2 eggs
  • 1 tsp vanilla
DIRECTIONS:

Preheat oven to 350.  Put dry ingredients in mixer bowl and mix together.  Add crisco and milk and beat well.  Add eggs and vanilla and beat until well combined.  Drop by spoonfuls (I used small cookie scoop) onto lightly greased baking sheet.  Bake for 8-10 minutes until you can touch the top and they just spring back.  You want them super soft and NOT browning much, if at all, on the edges. Spray sheets between each batch so they won't stick.  Let cool and frost bottoms, half chocolate and half white. They cool pretty quick so can frost within 15-20 minutes.

*I used half softened butter and half crisco, and they will still great.  Can substitute all butter I am sure, for those shortening haters.

Saturday, February 26, 2011

Renaissance Pasta

My wife is one tough chick.  Need proof?  I had her out digging sprinkler trenches in the back yard once.  Yeah, I have pictures.  She was nine months pregnant at the time.

And she never sleeps.  Honest truth here--when our first child was born, she told me her contribution would be to get up and take care of the baby at night.  I never looked back.

Did I mention the homeschooling?  Four kids.  One room.  It's like an educational cage match.

And then . . . there's me.  Did I mention, I'm a Renaissance Man?  I know, I can hear it all now.  "Brad, you are about as enlightened as the closet in a darkroom."  Or, "Brad, you make Neaderthal look progressive . . . ."

To which I'd say, you've never seen my Mona Lisa, my 5th Symphony, and my David--all wrapped into one delicious dish--the Renaissance Pasta.  I can hear it all now.  "Brad, you dirty little devil!!  I didn't know you cooked!"  Yeah, I keep it under wraps.  See, I've got it pretty good.  I wouldn't want to upset the delicate balance of nature by breaking out my kitchen skills too often.  I said I was "enlightened," not "stupid."  And so, I present to you, Renaissance Pasta. 


Well, back to reality.  Not all of us can bake like Rebecca.  So if you can't . . . or just don't . . . then here's one for the rest of us.  And the funny thing is, the kids ate it!

Micah.  Really getting excited about it.  Yum yum, what's to come?

Add caption

Eli only looks scared.  He's actually too young to know any better.


My secret weapon.  They never knew what hit 'em.


Proof he never saw it coming.  See the glazed eyes?


Almost just like Momma's cooking.


I've reproduced my very scientific methods below.


Ingredients:
1 box pasta - any kind
1 can or jar of pasta sauce - any kind
1 tsp salt
Grated parmesan cheese

Things to have ready:
1 large strainer
2 hot pads
1 empty sink
1 barf bag (you never know, you might need it.  Probably not, though)

Directions:
Fill a medium sized pot about 3/4 up with water.  Salt water.  Boil.  Dump pasta in the bowl.  [if you are making spaghetti or linguini, break the pasta in half first].  Bring water back to low, rolling boil.  Cook for ten minutes or until pasta has desired softness (the longer you cook, the squishier it is.  Ewwww!!!!)

While cooking, clean your sink and place one large strainer in there.  Pay attention to the pasta so it doesn't boil over.  If it is bubbling up too much, lower the heat and blow over the pot to prevent boiling over.

Using hot pads, pull pot off burner.  Pour contents of pot into the large strainer in the sink.  Pour away from you to avoid getting a steam burn.  Shake strainer gently to get excess water out.  Pour pasta back into the pot, or into another bowl.

Mix a small amount of sauce into the pasta to prevent it from sticking together.

Bring to the table and serve.  Sauce individual plates to specifications.  Add grated parmesan cheese to taste.

So easy a caveman could do it.

Thursday, February 24, 2011

Pasta Spinach Artichoke Bake


So, I was uninspired for dinner, and was thinking about making homemade macaroni and cheese.  But, I didn't want to have to make a separate veggie because I was feeling lazy.  And seeing how I have been on a little artichoke spinach kick, I figured "why not?"  It morphed as I made it and it the end result was nothing short of amazing.  It tasted like spinach artichoke dip over pasta.  Add in some tomatoes and caramelized onions and some cheese!  YUM!!  This would be fantastic without being baked too.  Make this one!


PASTA SPINACH ARTICHOKE BAKE


INGREDIENTS:

  • 1 lb. favorite pasta, cooked al dente
  • 1/2 onion diced and caramelized
  • 2 Tbsp butter
  • 2-3 Tbsp flour
  • 2 1/2 cups of milk (can substitute 1/2 c. with white wine)
  • 1 cup (ish) of shredded 6 Italian cheese
  • 1/2 cup velvetta cheese cubed
  • 1 tsp granulated garlic (or 3-4 fresh cloves minced)
  • few scrapes fresh grated nutmeg
  • 3/4 cup artichoke hearts chopped coarsely
  • 1 cup frozen chopped spinach, squeezed dry
  • 1 can diced tomatoes drained and squeezed gently or 1 c. chopped fresh
  • 1 cup mozzarella 
  • 1/4 c. parm cheese


DIRECTIONS:


Cook pasta according to directions in salted water.
Cook onion in some EVOO until caramelized and if desired add 3-4 fresh cloves garlic, minced at the end of cooking.  Set aside.


Over med heat melt butter and add flour and whisk to make a roux.  Slowly add milk (wine if desired), whisking as you add.  Reduce heat to med low.  Continue to whisk so not to burn milk.  When milk is thickened (about 5-10 min) add mixed Italian cheeses and velvetta.  Whisk and add granulated garlic, nutmeg and salt/pepper to taste.  Cheese will be stringy almost.  Keep whisking until it get more creamy and less stringy.  Add artichokes, spinach, tomatoes and onions.

Put pasta in 9x13 and pour sauce with veggies.  Stir to combine.  Sprinkle with mozzarella and parm. and put in oven for about 20 min. @ 350 or alternatively, broil for a few minutes to melt cheese.

Tuesday, February 22, 2011

Cavatelli with Broccoli and Caramelized Onions


Cavatelli is probably my all time favorite pasta.  It has a chewiness and is so hearty and just yummy.  It is hard to find depending on where you live.  Here on east coast, you can usually find it in the freezer section with other frozen pastas.  A few weeks ago, when my parents were visiting, we made it with steamed broccoli and it was delicious.  We talked about how some caramelized onions would be great in it.  I upped the ante by adding a bulb/head of roasted garlic and a handful of mozzarella cheese at the end.  This was a great dish and a big hit with the kids.

It takes a few minutes of prep about an hour before, but is about 1/2 hour from pot to plate otherwise.

Some possible additions would be shredded chicken, Italian sausage, red pepper flakes, a drizzle of balsamic glaze at the end or fresh diced tomatoes.  Delicious dish!


CAVATELLI WITH BROCCOLI AND CARAMELIZED ONIONS
serves about 6


INGREDIENTS:


  • 2 bags of frozen cavatelli
  • 1 large onion thinly sliced
  • good white wine
  • 1 head of garlic
  • 2 cups fresh broccoli
  • salt, pepper
  • 1 cup shredded mozzarella
  • lot of pecorino romano
  • EVOO


DIRECTIONS:

Put on pan of water for pasta and salt water with 1-2 tsp salt.  Preheat oven to 375.  Thinly cut top of garlic head.  Leave as whole head and peel off most outside papery casing.  Get a small piece of foil (7-8") and put garlic head on.  Drizzle with extra virgin olive oil (evoo) and salt and pepper.  Wrap up tightly into ball and put in oven for 45 minutes or until browned and tender.
Meanwhile, thinly slice onion and put in pan with evoo and small pat of butter,  salt and pepper and cook over med heat for about 1/2 hour, stirring every few minutes so not to burn.  Deglaze with white wine if needed.


 They should be a rich brown and look like this.

While onions are getting all sweet and delish, place broccoli in steamer basket (salt water streaming with) and steam until fork tender, about 15 minutes. 
Check garlic and remove cloves from casing by squeezing the bottom or using a small knife.  Coarsely chop garlic.  
Cook cavatelli until it is floating...  taste and make sure done. 
In a large serving bowl or pot mix pasta, caramelized onions,  roasted garlic, broccoli.  Drizzle with about 1/8 c. olive oil to start.  Toss in the mozzarella cheese and mix.  Cheese will get stringy.  Taste for seasoning (mine needed a fair amount of salt) and add more oil if needed.  Serve up with lots of pecorino romano (parm) cheese.

    Chewy, Chunky Blondies


    I promised to make a treat for our small group last week.  After being sick all day Tuesday and Wednesday, when Thursday rolled around, though I was feeling better, I wanted an easy but really yummy treat.  I made these bars once before and remembered how great they were and decided on making them.  This recipe is huge among food bloggers and there is a reason for it.  I changed 2 things... leaving out walnuts, because I don't like walnuts and don't like nuts in my cookies, and added 2 tsp of vanilla instead of one.
    Let me say, they were a huge hit.  It was a "can't stop at one" kind of treat.  They were still warm when I brought them and we all know there is not much better in life than a warm cookie dessert.  Super easy and such a delicious treat!


    CHEWY, CHUNKY BLONDIES
    adapted from: Dorie Greenspan "Baking: From my home to yours"


    INGREDIENTS:

    • 2 cups AP flour
    • 3/4 tsp baking powder
    • 1/2 tsp baking soda
    • 1/2 tsp salt
    • 2 sticks unsalted butter at room temp.
    • 1 1/2 cups packed light brown sugar
    • 1/2 sugar
    • 2 large eggs
    • 2 tsp vanilla
    • 1 cup semisweet or bittersweet choc. chips or chunked chocolate
    • 1 cup butterscotch chips
    • 1 c. coconut
    • 1 c. chopped walnuts  (opt.)

    DIRECTIONS:

    Preheat oven to 325.  Butter 9x13 pan and put it on baking sheet.
    Whisk together flour, baking soda, baking powder and salt.
    With the paddle attachment on stand mixer, beat butter on med. speed until smooth and creamy.  Add  both sugars and beat for 3 minutes.  Add eggs, one at a time, beating for one minute after each.  Beat in vanilla.  Reduce speed to low and add dry ingredients and mix until they just disappear into batter.  Use a rubber spatula and stir in chips and coconut (and nuts if you choose).  Scrape into prepared pan and smooth top.
    Bake for 40-45 minutes, or until knife comes out clean.  Top will be nice honey brown color.  Cool for 15 minutes and can turn out onto rack to let cool.  I cut them up right in the pan.

    Chocolate Caramel Fondue


    I love chocolate and I love fondue.  We went to Melting Pot a few weeks ago and had Turtle Fondue.  It was a yummy chocolate fondue with caramel undertones and then pecan pieces.  It was very delicious.  I was craving some fondue and bought some strawberries at Whole Foods today, so it seemed the perfect opportunity.  Well, it turned out to be a wonderful, but messy treat.  The kids all dipped at once and dropped their dippers in the chocolate, and the table was covered with drips of chocolate.  Eventually we got down a system where we dipped for them whatever their choice was.  By the end, Annalise (my chocolate lover) was asking for plain strawberries because it was so rich.  But it was so good!  A fun family night dessert that was a huge hit with all of us!
    We used the leftovers like hot fudge and it was divine!  Rewarm in microwave and pour over ice cream.  It hardens back up slightly, making it like the fudgy chunks in moose tracks ice cream.   Wonderful!


     CHOCOLATE CARAMEL FONDUE

    INGREDIENTS:
    • 3/4 cup cream
    • 1 1/2 cups choc. chips
    • dash salt
    • 1 tsp vanilla
    • 1/2 cup caramel ice cream topping


    DIRECTIONS:


    Warm cream over double boiler until hot and drop in chocolate chips.  Stir until melted and add pinch of salt and vanilla.  Stir and then whisk in caramel sauce.  Can dip strawberries, bananas, brownie bites, marshmallows, pound cake, pretzels, graham crackers, nilla wafers, or angel food cake.

    Italian Wedding Soup with Pearled Barley


    After coming off being sick, I wanted some soup!  Something not too heavy and full off goodness to nurse me back to the land of the living.  So, I had some ground turkey and thought some Italian Wedding soup would be good.  Normally, it is prepared with a small pasta, like pastina or orzo, but I wanted to use wheat berries or barley.  I settled on pearled barley, and it was very tasty.  The older two didn't even flinch at all the green.  Actually, the eldest said it was great!  Next time I will make it with pasta to vary it up, but it was very hearty with the barley.  (The barley does swell upon sitting)
    This makes a ton of soup.  Filled my stock pan.  So we will have it for leftovers and freeze the rest for a later illness.  So, I think this is worth making for sure, when nursing one back from the land of the "mostly" dead.


    ITALIAN WEDDING SOUP WITH PEARLED BARLEY


    INGREDIENTS:

    For the soup:
    • 4 med carrots, peeled and chopped
    • 1 large onion, chopped
    • 2 stalks celery, chopped
    • 3 garlic cloves, minced 
    • white wine for deglazing (1/3 c. ish)
    • 1 tsp garlic powder
    • 1 tsp. onion powder
    • 2 boxes low sodium chicken broth
    • 2 boxes water (just fill broth boxes)
    • 1 box frozen chopped spinach
    • salt and pepper
    For the meatballs:
    • 1 lb turkey
    • 3 TBSP milk
    • 1/2 c. parm cheese
    • handful fresh parsley chopped
    • 3/4 c. Italian or fresh bread crumbs
    • salt and pepper
    • 1 egg
    • 2 cloves fresh garlic minced or 1 tsp garlic power (not garlic salt!)

    DIRECTIONS:

    Cut up your veggies and put in stock pan with drizzle of EVOO over med high heat.  Cook for about 5-7 minutes, until just getting tender and add garlic.  Let cook a minute more and deglaze with white wine as needed.  Add water and broth and garlic and onion powder.  (If using barley, add it with broth).    Bring to a boil, reduce heat to just a simmer and cover.
    Meanwhile, mix all meatball ingredients together. Preheat oven to 375.  Spray sheet pan with nonstick spray.  Make tiny meatballs and place on sheet pan, leaving space between each.  Makes about 50-60 mini meatballs.  Place in preheated oven and let bake for about 20-25 minutes, turning once while baking.  Remove from oven.  (Soup will have cooked about an hour by now) If adding pasta, return soup to a boil and add pasta and spinach.  When pasta is almost cooked, add meatballs into soup and any necessary salt and pepper.  Serve with parmesan cheese sprinkled over the top with crackers or crusty bread.


      Monday, February 14, 2011

      Baked Onion Dip


      So, you may not be an onion fan.  That does not mean you will not like this dip.  It is my favorite.  I love it with ritz or wheat thin crackers.  The onions get deliciously sweet and super tender and it is just wonderful!  Annalise, at age 7, was devouring it!  This recipe is from my mom's friend Terrie.  Super easy and quick and just wonderful!

      BAKED ONION DIP

      • 1/2 c. mayo
      • 1 med sweet onion minced (chopped fairly fine)
      • 8 oz softened cream cheese
      • 2 c. cheese (I use 1 c. cheddar and 1 c. mozz.)
      • sliced almonds

      DIRECTIONS:

      Preheat oven to 350.  Mix together cheese, onion, cream cheese and mayo.  Place in pie plate or baking dish.  Bake for 20 min.  Cover with sliced almonds and bake for additional 10 min.  Serve with crackers or warm bread.

      Lightened Up Alfredo Sauce


      I grew up on wonderful alfredo sauce.  My mom is a fabulous cook and I remember the stick of butter and heavy cream being mixed with cheese, parsley and garlic and being poured over the pasta.  I loved every bite.  Until I became aware of what I was eating.  Then, I felt guilty for every bite.  :-)

      My cousin Michelle told me about yet another fabulous blog http://www.ourbestbites.com/ which had this wonderful sauce.   I added a few things, and because I like a very garlicy alfredo, I will add another 2 cloves of garlic next time.

      I also pan fried 2 big chicken breasts in a drizzle of olive oil and tastefully simple's garlic garlic and some salt and pepper and diced it up over the top.

      This was fantastic!  Could not tell it was not the real stuff.  The chicken on top put it over the top.  This sauce would be great to dip bread sticks in, or pizza crust.  YUM!  Try this sauce!  You will be so happy you did!

      LIGHTENED UP ALFREDO SAUCE (with Chicken)
      by: our best bites


      INGREDIENTS:


      • 2 C low-fat milk
      • 1/3 C (3 oz) low fat cream cheese, softened
      • 2 TBSP flour
      • 1 tsp salt
      • 1 TBSP butter
      • 3 garlic cloves, minced
      • 1 C grated Parmesan cheese
      • Handful fresh parsley-chopped fine
      • fresh grated nutmeg


      DIRECTIONS:


      Mix flour, milk and  softened cream cheese in blender or whisk together (if whisking make sure cream cheese is very soft).  

      In saucepan, melt butter and saute garlic over med-high heat for about 30 seconds, until bubbly.  (heavenly smell!)  Whisk in milk mixture and let cook for 3-4 minutes, until thickened and starting to simmer.


      Turn off heat and add parm cheese.  Sprinkle in parsley and a few grates of fresh grated nutmeg and whisk.  Cover and let sit for 10 minutes.  It will thicken upon standing.  Pour over pasta.   Enjoy!


      Note:  Will solidify in fridge.  With leftovers, just heat and then add a little milk to thin if necessary. 


      Pierogies


      Pierogies are a wonderful polish pasta that have various fillings. Kind of like ravioli, but different. Tradition fillings are cheese and mashed cheddar potatoes, but they can be filled even with prunes!  Sometimes a soft goat type cheese is used.  My dad's family uses cottage cheese, that has been drained overnight.  The cottage cheese are my favorite.  They are so absolutely delicious!  But the potato are also great.

      We usually fry these up in some butter, but they would be great smothered with caramelized onions or maybe dip the potato ones in sour cream. We make a meal out of them, but they would also be a great side dish.

      This is a very time consuming recipe, that my dad makes once a year, usually around Christmas.  We usually triple the recipe.  This year, we didn't make them at Christmas, so in a team effort we made them at the end of January at my house instead.

      These have to be frozen, or eaten pretty quickly, so they don't spoil.
      I hope you try and enjoy!


      PIEROGIES
      from Aunt Kate

      INGREDIENTS:


      Dough:
      • 3 c. AP flour
      • 2 eggs
      • 1 tsp salt
      • 1/2 c. water
      Filling:

      • mashed potatoes- with cheddar cheese added during the mashing
      • cottage cheese that has been drained in cheese cloth or fine strainer over night, uncovered
      Topping:

      • saltine crackers, ground in blender to fine crumb

      DIRECTIONS: 

       Whisk together salt and flour in one bowl.  In another bowl whisk water into eggs.  Pour slowly into flour mixture, mixing with wooden spoon, followed by kneading until smooth and elastic.  Don't over work or dough with be tough.


      Roll out on lightly floured surface or on silicone mat to about 1/8" thick, then cut into 3-4" circles (biscuit cutter works great!).  Roll each circle out to 1/16" thick.  Add about 1 TBSP filling, then fold in half, pinching the edges together firmly.  Make sure seal is very tight all the way around.
      Boil in water until they float, 3-4 minutes.  Immediately place into cold water, remove and drain.  Layer in pan or container, sprinkling each with saltine crumbs as a coating.  Place wax paper or plastic wrap between each layer.

      To prepare for eating, lightly fry in butter until golden brown and hot through, about 7-10 minutes.

      Spinach and Artichoke Stuffed Shells


      These shells were really delicious.  I have been wanting to make shells for awhile and just getting around to it.  My kids loved them and so did my husband.  I didn't get to bake them long enough to make my cheese brown because we had to get to church, but they were still great.  The filling is lighter than the normal shell filling, and very bright in flavor.
      If you are wondering what to make for your sweetie today, this would be a great choice! 


      SPINACH AND ARTICHOKE STUFFED SHELLS

      INGREDIENTS:

      • 1 box shells
      • 15 oz. ricotta cheese
      • 1 box frozen chopped spinach, thawed and squeezed dry
      • 1 can artichokes in water, drained and chopped med. fine
      • 2 garlic cloves crushed/minced
      • handful of fresh parsley, chopped
      • zest from 1/2 lemon
      • fresh grated nutmeg
      • 1 egg
      • 1 cup parm cheese, divided
      • 2 cup mozzarella cheese divided
      • jar of favorite sauce or homemade sauce

      DIRECTIONS: 

      Cook pasta in salted boiling water for about 6-7 minutes. Drain and spread out on cookie sheet or cutting board so they don't stick.
      In large bowl, mix together, ricotta, 1 cup mozz., 3/4 c. parm. cheese, lemon zest, garlic, spinach, artichokes, parsley and egg.  Grate some fresh nutmeg in as well.
      Preheat oven to 350 degrees.  In 9x13 pan, pour about an inch of sauce into bottom of pan.
      Spoon cheese mixture into each shell and place seam side up in sauce.  Continue until all cheese mixture is gone.  (I had lots of extra shells and threw them in a little pan with sauce and some cheese on top and baked them up too.)


      Spoon sauce over top just in drizzle.  Sprinkle remaining parm and mozz. cheese over shells.  Cover and bake for 25 minutes.  Uncover and bake another 15-20 minutes, until sauce is bubbly and cheese is melted and lightly browned.

      Poppy Seed Bread


       I have not made many quick breads lately, and was in the mood for some.  So, looking through my recipe book, I saw this and needed it!  This is such a delicious and moist bread.  The glaze seeps in a bit, not making it soggy, but just adding a zest and extra sweetness.  It is not the typical lemon poppyseed combination, but a buttery almond flavor that is just wonderful.  My kids love this bread, well... who am I kidding, it is more like a cake!  I would love to try this as a bundt cake and I am sure it would be great! Yes, the picture is only of half the loaf, because it got eaten before I could get the photo!
      This original recipe is from my Aunt Mary, but is also around on other recipe websites.  Super easy and delish!


      POPPY SEED BREAD

      INGREDIENTS:

      • 3 c. AP flour (I substituted 1 whole wheat)
      • 1 1/2 tsp. salt
      • 1 1/2 tsp. baking powder
      • 3 eggs
      • 1 1/2 cups milk
      • 1 1/8 c. canola oil (I substituted about 2/3c. drained applesauce, then did the rest oil, still great!)
      • 2 1/4 c. sugar
      • 1 1/2 TBSP poppy seeds (I used more like 2)
      • 1 1/2 tsp pure vanilla
      • 1 1/2 tsp butter flavoring
      • 1 1/2 tsp pure almond extract
      GLAZE:
      • 1/4 cup orange juice
      • 1/2 tsp vanilla
      • 1/2 tsp. almond extract
      • 1/2 tsp. butter flavoring
      • 1+ cup powdered sugar (add until creamy)
      DIRECTIONS:

      Preheat oven to 350.  Grease and flour 2 bread pans or spray with "Baking" nonstick spray.  Whisk together dry ingredients.  Whisk together wet ingredients.  Whisk dry ingredients into wet ingredients and mix for 2-3 minutes.  Pour into prepared bread pans.  Bake for 45-60 minutes (mine in electric oven was about 50 min).

      Remove from oven and prepare the glaze.  After 5 minutes remove bread from pans and place on foil or wire rack over cookie sheet.  Immediately, poke holes in top with a toothpick and spoon glaze over bread slowly, letting it absorb, until all the glaze is used.

      No Pudge Brownies


      So, in my continued quest for the perfect brownie, I heard about these.  I normally don't review mixes...  but I heard about these from our worship Pastor at church, Calie.  I must say, these are pretty awesome, amazing  for being no/low fat.
        Because I can't follow directions well,  I added a tsp or more of vanilla and some chocolate chips. I love chocolate chips in my brownies and I figured if they are low-fat, it wouldn't be so harmful to add a little fat.  These are really fabulous.  Fudgy and good chocolate flavor.  They just may be my new go to brownie, because I can eat the whole pan and while getting my entire calorie count for the day, I am still not as bad as off as I would be eating 2 sticks of butter in the normal homemade variety.   Kidding, well sort of.
      I actually had one for breakfast.  Breakfast of champions...  but hey, it's Valentine's Day and I am committed to my diet of sugar and chocolate on this day.  Go get this mix, and give them a try!  I think you may be surprised!

      http://www.nopudge.com/

      King Arthur Flour Fudge Brownies


      I am in search of the perfect brownie and I am picky.  I saw this recipe over on this website.  http://twopeasandtheirpod.com 
      They looked delicious, but I must say I was disappointed.  I have decided I am not a fan of espresso powder in brownies.  I love coffee, but just not in my brownie.  I find they tasted more like mocha brownies...  the top was too crumbly and the chips I added melted because I was obviously impatient and didn't let it cool enough.  Now, they do have nice texture and are not by any means inedible.   They are still very good and my husband and kids devoured them. Just not the perfect brownie to me.
        I will post the original recipe, but I would make 2 changes. I would leave out the espresso powder and I would add salt, which I added none of because the recipe I printed didn't have it listed.  But upon looking at the original recipe from the original website, I found it had 1 tsp salt. So, maybe I will try them again with those changes. 
      UPDATE:  Made them again and they were fabulous!  With the 2 changes from above, perhaps the perfect brownie.

      KING ARTHUR FLOUR FUDGE BROWNIES

      http://www.kingarthurflour.com

      INGREDIENTS:

      • 1 cup (2 sticks) unsalted butter
      • 2 1/4 cups sugar
      • 1 1/4 cups Dutch-process cocoa
      • 1 teaspoon baking powder
      • 1 tsp salt
      • 1 teaspoon espresso powder
      • 1 tablespoon vanilla extract
      • 4 large eggs
      • 1 1/2 cups all purpose flour
      • 2 cups chocolate chips


      DIRECTIONS:

      Preheat the oven to 350°F. Grease a 9″ x 13″ pan and set aside.
      In a medium-sized microwave-safe bowl, or in a saucepan set over low heat, melt the butter, then add the sugar and stir to combine. Return the mixture to the heat (or microwave) briefly, just until it’s hot (about 110°F to 120°F), but not bubbling; it’ll become shiny looking as you stir it. Heating this mixture a second time will dissolve more of the sugar, which will yield a shiny top crust on your brownies. Transfer the sugar mixture to a medium-sized mixing bowl.

      Stir in the cocoa, baking powder, espresso powder, salt and vanilla. Whisk in the eggs, stirring until smooth. Add the flour and chocolate chips. Stir until smooth. Spoon the batter into prepared pans.  Bake the brownies for about 30 minutes, until a cake tester inserted into the center comes out clean, or with just a few moist crumbs clinging to it. The brownies should feel set on the edges, and the center should look very moist, but not uncooked. Remove them from the oven and cool on a rack before cutting and serving.

      Makes 24 brownies

      Wednesday, February 9, 2011

      Cakes

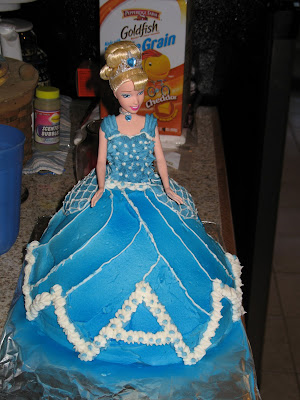
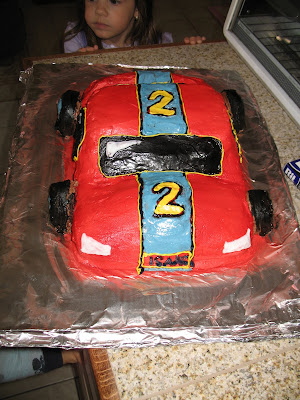
      In a couple of months, I will be in birthday season again.  Of course, we will moving right smack in the middle of it.  I like to make special cakes for the birthday's, and over time they have become increasingly more difficult and I have wanted to top myself.  So I figured I would  put of the pictures of each. 
      Really, not of them are that hard, but I take forever and my kitchen morphs into a war zone.  But, for me it is fun and I like to make my kiddos feel special.  And I am way to cheap to pay for someone else to do what I can do a completely mediocre job at.  ;-)   There is pictures missing that I will post when I find them.  Enjoy!


      Annalise's 4th Birthday, my first real cake

      Isaac's 2nd birthday.  The tires look a little flat and the whole thing a tad rough, but he loved it. 


       Pet Shops... she was obsessed, so I free-handed a copy from a coloring book.


       Isaac's 3rd birthday.  1st time using fondant.  I made it from marshmallows.  He was thrilled to have Batman.


       I call this my train wreck.  It was awful!  But Micah loved all the candy.


       This was for my nephew Sammy.  It was a last minute thing...  but he was happy. Love you Sam!


       Micah's 2nd Birthday.  Like all things in El Paso, it was melting. 


       Isaac's Transformer cake.  He was thrilled with, but it was a pain in the tush to do!


      So, this was my most challenging cake.  It was August and 100 degrees outside, 85 degrees inside, and humid and my fondant was sweating and Bolt was melting.  But all in all, I was happy.  

      Brad's Promotion Cake


       The JAG Insignia

      Isaac's Army Tank Cake for 5th birthday.  He had high expectations for this one.