Showing posts with label candy. Show all posts

Saturday, April 14, 2012

Chocolate Chip Cookie Dough Peanut Butter Cups


I know, right?

My cousin Michelle sent me this recipe.  They looked so yummy, but I had to wait for a block of time to be able to make them.  And especially so I could sit and watch talk shows with my bon-bons (picture the Cookie Monster meets Bridget Jones).  Because that is what I do all day.  Sit, watch talk shows and stuff my face. Uh-huh.  And I live in Neverland for part of the year.

Yeah, all that, plus these had more of those stages I am so terrible at.  Waiting, chilling, chilling more...  BAH!!  Anyway, these little things took a fair amount of time, though really quite easy.  And the result is wonderful.  They are kinda like Reese's peanut butter cups, or maybe a bit like buckeye's.  The kids love them and even my husband, who is not a fan of Reese's (I know, unbelieveable and insane) said he likes them.


Were these little suckers worth the effort?  Why, thanks for asking.  Sure were!


CHOCOLATE CHIP COOKIE DOUGH PEANUT BUTTER CUPS 
adapted from howsweeteats

INGREDIENTS:
makes 24 cups

  • 2 1/2 cups milk chocolate chips
  • 1 tsp crisco, divided
  • 1/2 cup unsalted butter
  • 1/3 cup packed brown sugar
  • 1 teaspoon vanilla extract
  • 1/4 cup creamy peanut butter
  • 3/4 cup powdered sugar
  • 4 tablespoons all-purpose flour
  • 1/2 cup mini chocolate chips
DIRECTIONS:
In a small saucepan, heat butter until melted. Whisk in brown sugar, bring to a boil and let it bubble for 1-2 minutes. Remove from heat and whisk in peanut butter. The mixture will be runny. Whisk in vanilla. Let sit and cool completely, about 20 minutes.
Line a mini muffin with with liners (the silicone ones works really well). Melt 1 1/4 cups of chocolate chips with 1/2 tsp crisco (I do mine in the microwave, heating on full power for 20 seconds, stir, 30 seconds again, and stir until melted). Drop 1/2-1 teaspoon of chocolate into each liner, then use a pastry brush to brush chocolate up the sides of the liner. Place in the freezer for 20 minutes. By this point the butter/sugar mix should be cool. Whisk in powdered sugar and flour, until combine and few lumps remain. Fold in mini chocolate chips. The dough will be wet, but pop it in the fridge for 15 minutes to harden.
 Remove muffin tin and cookie dough, then place 1 teaspoon of cookie dough (I mashed mine) into the chocolate cups. Melt the remaining chocolate chips with 1/2 tsp of crisco, then cover each cookie dough top with chocolate, smoothing with a spoon. Freeze again for 15-20 minutes. These are fine out in room temperature for a few hours (they may soften a bit) but are great out of the fridge.

Thursday, January 5, 2012

Oreo Truffles


 I had these a few years ago for the first time.  My favorite are dipped in white chocolate (even though I am not a huge white chocolate fan) topped with peppermint pieces.  The combination had me craving them!  These are so simple and so yummy.  I saw a recipe that used nutella in place of some of the cream cheese, which I will be trying at some point!  Anyway, these are awesome and easy! 


OREO TRUFFLES
  • 1 package Double Stuffed Oreos  
  • 4 oz. cream cheese, softened (you can use up to 8 oz., based on consistency you like better)
  • Dipping chocolate (or 1 cup choc. chip with a few tsp shortening)
Chop Oreos up finely in a food processor.  Save some of the finely crushed Oreos for garnish later and set it aside.  You don't need too much.
With hands (or a spoon, I just think hands are faster), mash softened cream cheese and crushed Oreos until well combined.
Roll into 1" balls and place on a wax covered cookie sheet. Put in freezer for 15 minutes.
While balls are in freezer, melt chocolate according to directions.
Pull the Oreo Truffles out of freezer, and dip into chocolate.  Garnish with reserved Oreo crumbs or crushed peppermint candy, before the chocolate sets up.
Let chocolate set, refrigerate and enjoy!

Friday, December 23, 2011

Peppermint Bark


This peppermint bark is fabulous!  I used a good chocolate and made it a bit thicker, so it didn't quite fill the jelly roll pan.  I found the recipe on my friend Cristine's blog, http://cristinecooks.blogspot.com/  and as always, a great recipe!  Don't pay lots of money for the stuff in stores...  seriously easy to make!  Enjoy!


PEPPERMINT BARK
INGREDIENTS:
  • 12 oz bitter sweet chocolate, finely chopped
  • 12 oz white chocolate, finely chopped
  • 1/4 cup whipping cream
  • 1 tsp Peppermint extract
  • 6 oz peppermint candies
DIRECTIONS:
Line a 13 x 9 baking pan with foil( use non stick foil), make sure you let the sides overhang so you can pull the bark out when its done.
In a heavy duty zip lock bag, crush the peppermints.
In a double boiler, melt the dark chocolate, peppermint extract and whipping cream and stir until smooth. Pour the dark chocolate into the baking pan and evenly smooth out.
Place in the fridge for about 15 minutes to firm.
In a double boiler, melt the white chocolate and stir until smooth.
Remove the dark chocolate from the fridge and with a paper towel, blot off and moisture that has accumulated on the top. Pour the white chocolate over the dark chocolate.
Sprinkle the peppermint candies over the white chocolate.
Place in fridge to firm for about 1 hour. Remove and cut to your desired shape and size.
Store in the refrigerator in an airtight container.

Wednesday, October 26, 2011

Apple Cider Caramels


These caramels have an intense apple cider taste and are rich and buttery.  These are a little bit time consuming, but I enjoyed the end result.  My caramels didn't firm up as much as they should have, so they needed to remain chilled, but I kind of like that anyway.  I think I needed to let them cook a little longer to get a firmer caramel.  I toyed with the idea of doubling the recipe, thinking a little 8x8 pan would not yield nearly enough for my sweet tooth.  I am so glad I didn't!  One of these a day will do ya, and even after sharing with some neighbors we have a ton of caramels!  Rest assured, we will "suffer" through and every last one will get eaten.  I think these would make a great little treat to give to parents when they come by with trick or treating little ones. 


APPLE CIDER CARAMELS
Recipe adapted from:  Our Best Bites
 
INGREDIENTS:

  • 2 c. high-quality apple cider (like Simply Apple)
  • 1 c. heavy cream or whipping cream, divided
  • 1 tsp. ground cinnamon
  • 1/2 tsp. apple pie spice
  • 1 1/2 c. sugar
  • 1/3 c. light corn syrup
  • 1 stick (1/2 c.) real butter, cubed
DIRECTIONS:

Pour cider into a medium saucepan and boil on high for about 20 minutes or until the cider is reduced to 1/3 cup. (keep a glass or silicone measuring cup handy so you can pour it out and back in again if you need to and watch it near  the end). It should be thick and syrupy.  Set aside to cool.
Line an 8″ square pan with parchment paper, making sure to leave about 1″ hanging over the edges for easy removal. Spray with non-stick cooking spray and set aside. In a small bowl, combine 2/3 c. cream, spices, and reduced apple cider. It will be thick and smell divine.  Set aside.
In a large, heavy saucepan, combine the sugar, 1/3 c. whipping cream + enough water to reach the 1/2 c. line on the measuring cup, and corn syrup. Cook over low heat until the sugar dissolves. Insert the candy thermometer and simmer until the syrup reaches 234 degrees.
Remove from heat and slowly whisk in the cream mixture. Add the cubed butter and stir until the cream and butter are fully incorporated. Return the pan to heat and re-insert the candy thermometer. Cook over low heat, stirring frequently, until the temperature reaches 248 degrees (this takes a long time, like 20 minutes or longer).
Remove from heat and pour the caramel into the prepared pan. Let the mixture cool completely at room temperature or in the refrigerator. Cut the caramels into 1/2″ squares and wrap each caramel in wax paper. Store in an airtight container or in the refrigerator for up to 2 weeks.

Sunday, October 2, 2011

S'more Caramel Popcorn


This is an evil, evil thing.  It is so sweet, it is almost like candy.  But it is hard to stop eating.  It is even good stale (I know, I know...).  A bowl got left on the counter and my husband and I devoured it and both mentioned how we liked the chewy texture.  The kids all loved this.  But it is an evil thing.  If you like the idea of smore but not as sweet, leave the popcorn plain, but I am an all-in kinda girl, and this is an all-in kinda dish.

S'MORE CARAMEL POPCORN

INGREDIENTS:
  • 7 cups(ish) caramel corn (or plain)
  • 1/2 bag mini marshmallows
  • 2 cups golden grahams cereal
  • 1 cup chocolate chips
  • 1 tsp shortening
DIRECTIONS:

Put oven to broil.  Spray cookie sheet with nonstick cooking spray.  Spread out caramel corn and add golden grahams.  Mix it up.  Spread marshmallows in an even layer over caramel corn mixture.  Put under broiler for 2-3 minutes, until just toasted.  WATCH  CAREFULLY!  (the caramel  on the caramel corn will burn!)  Melt chocolate with the shortening in microwave or over double boiler.  (Double boiler may produce a more drizzly chocolate).  Drizzle chocolate over the mixture (or blob it as I did).  Use every bit of self-control you can muster, and let sit until chocolate hardens some.   (As you can see from the main picture, I failed in my self control.)  Break up and enjoy the chewy, gooey sin in a bowl.

Caramel Corn


I remember my mom making this when I was a little girl.  I loved to watch as she would shake it up and nuke it and shake it up.  It tastes so good! It produces a shiny caramel popcorn, with great flavor and clean up is a breeze!  Also, kinda funny, but I even like this stale, because it gets chewy.  A great old-time recipe. 
One word of caution, watch the caramel in the microwave because it can boil over.  Also, a ton of butter is absorbed in the paper bag, so don't fret about it being greasy. 

CARAMEL CORN

INGREDIENTS:
  • 15 cup(ish) popcorn (about 3/4 cup un-popped)
  • 1 stick butter melted
  • 1 cup brown sugar (I used dark and light)
  • 1/4 cup corn syrup
  • 1/2 tsp baking soda
  • splash vanilla
  • big, clean brown grocery bag
DIRECTIONS:

Stir together butter, brown sugar and corn syrup.  Put in large microwave safe glass dish and heat on high for 2 minutes.  Take out and stir and microwave another 2 minutes (I only could do mine about 45 seconds because it kept threatening to boil over).  Add vanilla and baking soda and stir until frothy and foamy.  Put popped popcorn in paper bag, and pour caramel over.   Fold top over several times. Shake bag.  Microwave for 1 minute.  Shake and repeat 3 more times, microwaving for 1 minute, then shaking.  Dump it out in a big bowl, and then suffer through eating what is stuck to the inside of the bag.  ;-) Enjoy!

Wednesday, July 27, 2011

JUNK (Pope's bread or Pane papato)


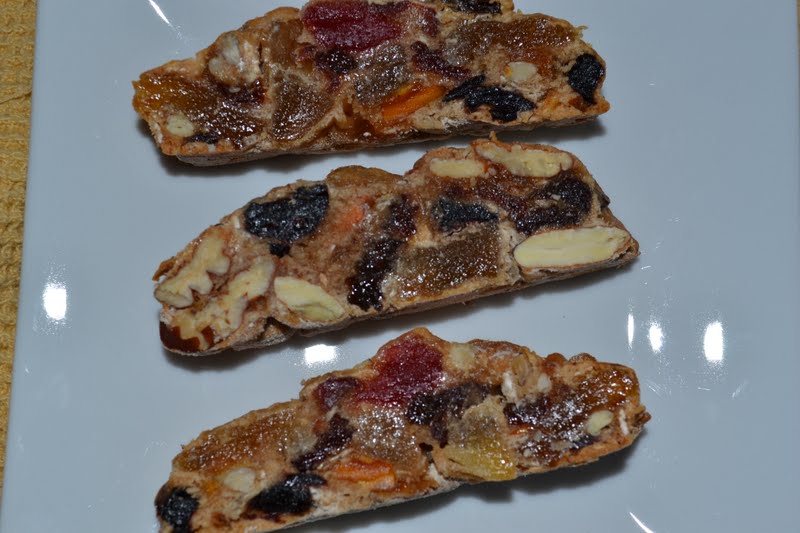
This is an Italian fruit snack/bread that is packed with dried fruit and nuts and is like candy.  It is traditionally made around Christmas.  It keeps forever, is great for traveling (no crumbs), is very versatile and tastes so wonderful!  This can be made with any dried fruit.  Traditionally it had cocoa powder and candied fruit rinds (orange, lemon).  I like it the way my grandmother makes it though.  Lot of nuts, honey and dried fruit.   We used almonds, pecans, hazelnuts and Brazil nuts traditionally, but you could used walnuts, and any other nuts you want.  You could probably do candied ginger in teeny tiny pieces too.  I even added sesame seeds this time.  Pretty easy really, and it makes a lot to last you.  I freeze my loaves and take them out as needed.  I have heard you can seep them in wine too.  But we love it sliced and eat it like an energy bar. The name "Junk" came from my mom's because she couldn't say "Pane Papato" and it stuck.  It is my father-in-law's favorite!

JUNK or POPE'S BREAD

INGREDIENTS: what I used
  • 1 lb. almonds
  • 1 lb. pecans
  • 3 TBSP sesame seeds
  • 1 lb. dried pineapple
  • 1 cup dried dates
  • 1 cup dried raisins
  • 1 cup dried strawberries
  • 1 cup dried blueberries
  • 1 cup dried mango
  • 1 TBSP cinnamon (I like a lot. Start with less, and go by your nose. Could even use pumpkin pie spice)
  • 1/2 cup oatmeal (my dad doesn't like the oatmeal, but I do :-)
  • 32 ounces (2 LB.) honey
  • 1-2 cup of whole wheat flour and more for kneading in
DIRECTIONS:

Pour all nuts and dried fruit in a bowl.  Add spices you desire.  Toss to coat.  Dump in honey.  You want it to be coated well.  (this is the only binder in it).  Add the flour and stir.  Add some more until it looks like this.

Sprinkle about 1 cup flour on counter and put some big spoonfuls down on top.
Knead the flour into the bread and begin forming a loaf from it.  Like this.
It will begin to hold together.  Don't do too much flour.  You want it to hold loaf form, but not be dry.  After you knead it, working the flour in, form a loaf about 1 1/2" tall, 4 inches wide and 10-12" long.  Like this.  

Line a cookie sheet with parchment and preheat oven to 350. Transfer carefully to cookie sheet.
Make more loaves to put on the cookie sheet like this.
Bake until just begins to brown, about 30 minutes.  Don't overcook!  When it comes out it will be hard and seem impossible to eat.  Will look like this:
When cool, use a very sharp knife to slice.  Enjoy!

Saturday, June 18, 2011

Chocolate Sea Salt Caramel Bars

This may be my new favorite dessert,(candy).  I saw on a friends blog, Millionaires Grey Salt Shortbread,  which looked amazing and I bookmarked it awhile ago.  I just didn't have the grey salt.  Turns out grey salt is just a variation of sea salt.  But I got it anyway. 


I went to make it today and say that in the shortbread alone there was 3/4 lb of butter.  Yes, 3 sticks.  I just couldn't bring myself to do it.  Plus, as I have said before, I am not a huge shortbread fan. 
So, I did some research and found Espresso Caramel Bars from Giada De Laurentiis, and printed it off.  I have made some changes.  First, I did pure chocolate on top.  The ganache might be nice to cut the sweetness.  Will try next time. (posted recipe below)  Second, I made the caramel salted caramel!  Anyway, this has a few steps, but is really easy.  Just follow the directions!  No stirring the caramel!
These are SUPER SWEET!  Really a candy.  They are wonderful frozen.  An inch square will do you.  Seriously, one pan will serve at least 30 people.  Cut them small and have some milk standing by!

CHOCOLATE SEA SALT CARAMEL BARS

INGREDIENTS:

For the crust:
  • 2 cups graham cracker crumbs
  • 1/4 cup sugar
  • 1 stick unsalted butter, melted
  • 1/2 tsp cinnamon
For the Caramel :
  • 1/2 cup whipping cream
  • 1 stick unsalted butter, room temp.
  • 1 1/2 cups light brown sugar
  • 1 TBSP water
  • 1/2 tsp sea salt (I used my grey)
  • 1/4 tsp vanilla
For the Chocolate: *
  • 2 cups good chocolate (semi-sweet)
  • 1/2 TBSP butter
  • (can add 1 tsp of espresso powder if desired)
Sea salt for top.

DIRECTIONS:

For the crust:  Preheat oven to 350.  Line 9' pan with foil or spring form with parchment.  Spray with cooking spray.  Mix graham cracker crumbs, sugar and cinnamon.  Pour in melted butter and mix well.  Put into prepared pan and use the bottom of measuring cup to press into pan.  Bake for 10-12 minutes in preheated oven, until golden.

For the caramel:  Put all ingredients, except vanilla, into saucepan over med high heat.  Stir until butter is melted and mix is smooth.  Put in candy thermometer and DO NOT STIR ANY MORE!  Bring to 240 degrees (5-7 minutes).  When reaches 240, pour in vanilla and give fast stir and pour hot caramel over graham cracker crust.  Leave for 20 minutes to cool, then freeze for 10 minutes.

For chocolate:

Melt chocolate chips or chopped chocolate in double boiler or microwave in 30 second intervals with cream, until smooth.  Carefully spread over caramel topping.  Sprinkle top with sea salt.  Chill for an hour.  This will possibly be the longest hour of your life.  Cut and serve (with milk).

*Giada's recipe calls for 1/2 cup cream with chocolate chips and 1 1/2 tsp espresso powder, over double boiler. Mix until smooth.*

Tuesday, January 11, 2011

Chocolate Truffles


I have always wanted to make truffles.  Holiday time was the perfect time to try.  I just couldn't decide which recipe to try.  So, of course, having a bit of OCD sometimes, I made two!  These were both very tasty, the balsamic dark chocolate had a surprise little bite and the milk chocolate were melt in your mouth.  The cocoa powder on the outside is bitter, so I do think these would be best covered in regular melted chocolate or powdered sugar instead of cocoa powder.  I think the milk chocolate lasted longer as far as shelf life.  The balsamic ones needed more cream than the original recipe called for, so I adjusted it.  Honestly, I think about 1/2 cup of  cream for each recipe would be about right because the plain chocolate, though super creamy, had to stay in the refrigerator even after they were complete, or they would lose shape and start to melt.  


BALSAMIC CHOCOLATE TRUFFLES

adapted recipe from Giada De Laurentiis

Ingredients

  • 8 1/2 ounces dark chocolate, chopped
  • 1/3 cup cream
  • 3 teaspoons balsamic vinegar
  • 1/2 cup cocoa powder

Directions

Melt the chocolate and cream in a double boiler over hot but not simmering water. Place melted chocolate in a small bowl. Stir in the balsamic vinegar. Cool the chocolate in the refrigerator for 1 hour. Remove from the refrigerator and let sit at room temperature for 2 hours, until firm but moldable.

Use a teaspoon to scoop out chocolate. Use your fingertips to shape into balls about the size of a cherry. Set the chocolate balls on a parchment-lined tray.

Place the cocoa powder in a small shallow dish. Place 6 truffles at a time in the cocoa powder and roll the truffles around to coat, and return the coated truffles to the baking sheet. Continue with the remaining truffles. Place the truffles in a serving dish or airtight package.


CHOCOLATE TRUFFLES
Joyofbaking.com

INGREDIENTS:

8 ounces semisweet or bittersweet chocolate, cut into small pieces
3/4 cup heavy whipping cream
2 tablespoons unsalted butter
2 tablespoons alcohol (Cognac, brandy, Grand Marnier, kirsch, rum, bourbon, or Kahlua to name a few) (optional)
Different Coatings for Truffles:
Dutch-Processed Cocoa Powder
Confectioners Sugar (Icing or Powdered)
Toasted and Chopped Nuts (pecans, walnuts, almonds)
Toasted Coconut
Shaved Chocolate


For Truffles:  Place the chopped chocolate in a medium sized stainless steel bowl. Set aside.  Heat the cream and butter in small saucepan over medium heat. Bring to a boil.  Immediately pour the boiling cream over the chocolate and allow to stand for 5 minutes. Stir with a whisk until smooth.  If desired, add the liqueur. Cover and place in the refrigerator until the truffle mixture is firm (this will take several hours or overnight).
Place your coatings for the truffles on a plate. Remove the truffle mixture from the refrigerator. With your hands, or melon baller or small spoon form the chocolate into round or mid-shaped bite-sized balls. Immediately roll the truffle in the coating and place on a parchment lined baking sheet or tray. Cover and place in the refrigerator until firm. Truffles can be refrigerated for a couple of weeks or else frozen for a couple of months. Bring to room temperature before serving.
Makes 30 small truffles.
To Toast Nuts: Preheat oven to 350 degrees F and bake nuts (pecans, walnuts, or almonds) about 8 - 10 minutes or until brown and fragrant. For hazelnuts toast about 15 minutes or until the skins start to blister. Remove from oven and roll in a clean dish towel. Let the nuts 'steam' for about 5 minutes and then remove the skins. Once the nuts have cooled, chop coarsely. 

Tuesday, January 4, 2011

Peanut Butter Balls (Buckeyes)

These are a trraditoinal easy cookie, or candy really.  My mom always made them at Christmas and so now I do.  They are easy to pop in the mouth and let melt away.  Always a favorite and classic.


PEANUT BUTTER BALLS (BUCKEYES)
adapted from Joy of Baking

Ingredients:
  • 2 cups creamy peanut butter
  • 1/4 cup (1/2 stick) unsalted butter, room temperature
  • 1/4 teaspoon salt
  • 1 tsp pure vanilla extract
  • 2 - 2 1/2 cups confectioners (powdered or icing) sugar
  • can add 1 c. crushed graham crackers or 2 c. rice crispies)
  • Chocolate Coating
  • 9 ounces semi sweet chocolate, coarsely chopped or choc. chips
  • 2 tablespoons vegetable shortening

DIRECTIONS:


Place the peanut butter, unsalted butter, and salt in a microwaveable bowl, and heat in the microwave for about one minute or until just soft (check and stir the ingredients every 20 seconds). Stir in the vanilla extract and confectioners sugar and mix until it has the consistency of a dough (add more sugar if necessary). Then add rice crispies or graham crackers crumbs.
Roll the dough into 1 inch, or smaller, round balls. Place on cookie sheet and refrigerate for about one hour, or until firm.
Melt the chocolate and shortening in a heatproof bowl over a saucepan of simmering water or in 30 second intervals in the microwave. Dip the balls, one at a time, in the melted chocolate, making sure the entire ball is coated with chocolate. Then, with two spoons, remove the peanut butter ball from the melted chocolate. Place the covered balls back on the baking sheet. After all the balls have been dipped in the chocolate, place in the refrigerator until the chocolate has set. Store in an airtight container for up to two weeks. To serve: place in small fluted candy cups.
Note: If you want to make Buckeyes: place a toothpick into each peanut butter ball and dip, one ball at a time, into the chocolate, leaving the top quarter of each ball undipped.
Makes about 40 pieces, depending on size.