Tuesday, May 29, 2012

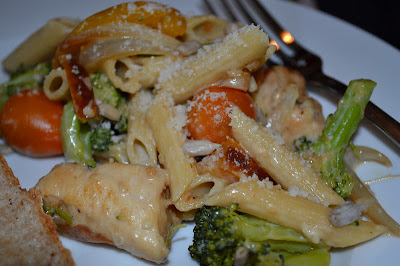
Creamy Garlic Veggie Pasta

  This meal was so delicious.  I saw a recipe on pinterest and then saw a cream sauce and adapted them both to fit my needs.  I say "needs" because I needed this dish.  I had to have it... and when I read the recipe and was disappointed, I had to make it into what I was craving.  Seeds on pasta?  Yes.  Bizzare? Uh-huh.  But that is just kinda who I am.  Deal with it! 
  My kids all loved this and so did Mr. Delectable.  And even though the sauce is super rich tasting, it is WAY lighter than normal alfredo sauce.  "Creamy" does not have to equal scary and bad for you.  Don't skip the sunflower seeds!  They add a nice crunch and interest to this dish.   
CREAMY GARLIC VEGGIE PASTA
INGREDIENTS:
  • 16 oz. of Whole Wheat Penne Pasta 
  • 2 tbsp. olive oil, divided
  • 2 Boneless Skinless Chicken Breasts, cut in 1″ cubes
  • 1/4 tsp. salt
  • 1/4 tsp. pepper
  • 2 TSBP McCormick Crusting Blend (Italian herb and cheese)
  • 1/2 c. Onion, diced
  • 2 cloves Garlic, minced
  • 1 yellow or red Bell Pepper, long thin slices 
  • 1 c. Grape tomatoes
  • Sunflower seeds (lightly toasted in oven or pan)
DIRECTIONS:
Cook your pasta.  Sprinkle the chicken breast with salt and pepper. Heat 1 tbsp. oil in a skillet over medium heat and cook chicken until done and golden on all sides, adding the crusting blend when about half way through cooking. Remove and let rest in a large bowl.
Add the remaining olive oil and begin sauteing the onions and bell peppers for 2 min. Add in the garlic and saute another 2 mins. Then toss in any other woody veggies  (broccoli, asparagus), cooking until desired firmness, saving the tomatoes until the very end.
When everything is cooked, combine the veggies with the chicken in your big bowl. Now its time for the sauce!

FOR THE SAUCE:


INGREDIENTS:
  • 2 TSBP butter
  • 3 garlic cloves
  • 1 1/2 TBSP flour
  • 2/3 cup milk (I  used skim)
  • 1 cup evaporated milk (not condensed!!)
  • 2/3ish cup parmesan cheese
  • salt and pepper
  • dash of nutmeg

DIRECTIONS:
Heat butter over skillet.  Add the garlic and let cook for 30 seconds.  Add the flour and cook for another 30 seconds.  Add the milk and evaporated milk and cook over med low heat until thickened.   Reduce heat to low, and add cheese, salt, pepper and fresh grated nutmeg.  Cook until cheese is melted.  

Pour over veggies and stir.  Top with toasted sunflower seeds and more Parmesan cheese. 
Cherry Delight Breakfast Cake


Growing old sucks.  Seriously...  now I have to go to gym and work out for an hour just to burn off the calories from looking at food.  If it goes in the mouth, make it 2 hours.  So depressing.   At least if I am still going to eat it, it should taste amazing.  Like this cake.
I saw this cake forever ago on my friends Cristine's blog,  cristinecooks, and have been pining to make it since I first saw it.  It just looked so delicious and I just loved the name of it.  I have been making goodies for my church each Sunday morning, just to relieve my baking addiction without suffering from having to consume it all by myself.
Before the glorious drizzle.

I got up early to whip this up and it was very easy.  The result was so good!  Loved it!  It reminded me of entenmann's danish a little bit.  I would love to add streusel to the top next time. I could've easily eaten half the pan.  It was kind of fun to watch or rather listen to people eat this delightful little cake.  It was start with a little "oh", then move on to some "Wow!  that is really good" and some more "oh's".  Don't wait over a year to make this cake, and don't be intimidated by the yeast.  It is easy, and would be great any time of day!


Cherry Delight Breakfast Cake
Recipe from Tami's Kitchen Table TalkINGREDIENTS:


For the cake:
  • 3 C. flour (I used 1/2 whole grain)
  • 1/4 C Sugar
  • 1 tsp salt
  • 2 1/2 tsp active dry yeast
  • 1/2 C. milk
  • 1/2 C water
  • 1/2 C butter
  • 2 eggs
  • 1- 21 oz can Cherry Pie Filling
For Cake Glaze:
  • 1/2-3/4 C confectioner's sugar
  • 1/2 tsp vanilla
  • 2-4 tsp milk


DIRECTIONS:
Combine 1 1/2 cups flour, salt, sugar & yeast and mix well. Heat 1/2 cup milk, water and butter until very warm and then add to flour mixture, along with eggs. Beat at low speed with hand mixer until all ingredients are wet; beat 3 minutes at medium speed. Stir in an additional 1 to 1 1/2 cup flour until a stiff batter forms. Cover loosely with plastic wrap and a towel. Let rise about 45 to 60 (I did 60 minutes)  minutes or until doubled in size.
Grease a 13 x 9 pan. Stir batter; Pour 3/4 batter into pan and top with cherry filling. Spoon remaining batter by tablespoons over batter. Cover again and let rise until light, approximately 20 - 30 minutes (I did 30 min).
Heat oven to 350 degrees F. Uncover dough mixture. Bake 30-35 (I baked 35) minutes or until golden brown.  You want to make sure it is not doughy.  You can carefully lift the cake around the pockets of cherries and make sure it is not doughy there.

Meanwhile make glaze:

Mix sugar and 2 tsp milk, and 1/2 tsp vanilla. Continue adding a little milk until a thick glaze consistency is created. Drizzle over cake while still warm.  Serve warm or room temperature.

Whole Wheat Pita Bread


Again, been cooking, just not blogging.  We are in our last week of official school, and then we go to testing.  I can't wait to be done.  This year has been a bit painful.  But at the same time, I am excited for next year's school to begin.  I am so fickle.  

Not about pita's though.  I love pitas and homemade is just that much better.  We really enjoyed these pitas.  I think I would experiment with some other recipes before I commit to this one, but this is a solid and pretty easy recipe.  Making these with all the other things we made this night was a chore.  We did grilled lemon garlic chicken, tzatziki, roasted veggies and kale chips.  It was a meal where I wished I was a cow, and had four stomachs, or compartments, or whatever.  Oh, to eat like a cow!  

One other note.  I found these rise times to be true to form.  A lot of recipes I find I need to add time to get the rise I need, but this one rose beautifully.  Enjoy!

WHOLE WHEAT PITA BREAD
recipe from: thegalleygourmet

INGREDIENTS:
  • 2 Tablespoons honey
  • 2-2 1/2 cups lukewarm warm water, divided
  • 4 1/2 teaspoons active dry yeast, (two 1/4-ounce packages)
  • 3 cups (13 1/2-ounces) unbleached all-purpose flour
  • 3 cups (13 1/2-ounces) whole wheat flour
  • 1 Tablespoon kosher salt
  • 1/4 cup extra virgin olive oil plus 2 Tablespoons for coating
  • cornmeal for dusting
DIRECTIONS:

In the bowl of a stand mixer fitted with the dough hook, stir together the honey and 1 cup of the warm water.  Stir in the yeast and set aside until the yeast has bloomed, about 5-10 minutes.  Add both flours, salt, 1/4 cup oil, and 1 cup of the warm water.  Mix on low speed until the mixture is smooth and elastic, adding up to 1/2 cup more water a tablespoon at a time as needed.  Increase the speed to medium and knead for 4-5 minutes.  Turn the dough out onto a lightly floured surface and shape into a ball.  Drizzle 1 tablespoon of the oil in the same mixing bowl. Return the dough to the oiled bowl, drizzle the top of the dough with the remaining oil, turning to coat the dough with oil.  Cover the bowl with a cloth or piece of plastic wrap and set in a warm, draft-free place to rise until doubled in size, about 1 hour.


Gently deflate the dough and let rest for 20 minutes.  Turn the dough onto a lightly floured surface and divide the dough (I like to use my kitchen scale) into 12-14 even pieces, about 3 3/4-ounce each.  I found my first ones I weighed were too big.  Better to go with your gut sometimes.  Shape each piece into a ball on an unfloured area of the counter, cup your hand over it, and quickly rotate your hand over the dough, forming a tight, evenly round ball.   On the lightly floured surface of your counter, roll each piece of dough into a 1/8-inch thick circle, about 7-inches in diameter; keeping the remaining dough balls covered with a sheet of plastic wrap.  Set each round on a large baking sheet without overlapping.  Lightly dust the rounds with cornmeal to prevent them from sticking.  Cover the dough with a lightly damp towel and let them rise for 1 hour until puffy, but not necessarily doubled in size.  


Meanwhile, position a rack in the bottom third of the oven and preheat the oven to 500ยบ F.  Bake the dough rounds one baking sheet at a time until the pitas are puffed and lightly golden, about 5 minutes.  As each batch comes out of the oven, stack the pitas 3 or 4 high and wrap in clean kitchen towels.  Serve immediately or let cool to room temperature.  Best served day of, but will keep for up to 3 days or in the freezer for up to 6 months.  Enjoy!

Saturday, May 26, 2012

Baked Bruschetta Dip


This is my all time lowest blog month.  I have no idea how time has gotten away from me, but it has.  I have still been cooking and have a gazillion (official number) recipes to blog and post.  Some I am not even sure I remember. 
 Anyway... this one, was an original and man was it yummy.  The heat blast from broiling the cheese intensifies the sweetness of the tomato and makes it robust and so flavorful.  A great new twist on an old favorite.

BAKED BRUSCHETTA DIP

INGREDIENTS:

  • 2 cups chopped tomatoes (I would use grape or vine ripened)
  • 3 cloves minced garlic
  • 4 TBSP extra virgin olive oil
  • 2 tablespoons balsamic vinegar
  • 1/4 cup fresh basil, stems removed
  • 1/4 teaspoon salt
  • fresh ground pepper
  •  French baguette
  • 2 cups shredded mozzarella or provolone cheese (or Italian blend)
  • Parmesan cheese for top
DIRECTIONS: 
Chop tomatoes and seed as much as possible (not obsessively) and place in a baking dish.  Add garlic and basil.  Stir gently.  Add oil, vinegar, salt and pepper and stir gently again.  Let sit for about 30 minutes. Meanwhile, slice bagette thin and toast.  Stir again and top with cheese.  Broil until cheese is melted and beginning to brown for about 5 minutes, watching carefully to avoid burning.  Serve hot, spooning over bagette or dipping in with bagette or we used garlic calabrese crisps.  *Note-  Last time I made it, I drizzled the top with balsamic glaze and fresh pesto after baking and it was delicious!!
ENJOY!
 

Wednesday, May 16, 2012

Pasta with Aspagus Cream Sauce and Roasted Asparagus


So, I have been going to the gym for like an hour and a half 5 days a week for the last few weeks.  Seeing how I am working my tush off, I am trying not to undo all that hard work with my dinner.  I have always been pretty conscientious about what I make for dinner and try to do healthy. 

I bought an obscene amount of asparagus at Sam's the other day.  It was starting to wilt, so I knew I had to use it tonight.  Had this brain child and am so glad I did.  This pasta was so creamy and really delicious.  I wanted a creamy sauce, but didn't want the guilt.  After trying this method, I will be trying it with all sorts of veggies.

PASTA WITH ASPARAGUS CREAM SAUCE AND ROASTED ASPARAGUS

INGREDIENTS:

for the sauce:
  • 2-3 pounds of asparagus (stems, keep spears for roasting)
  • 1/2 cup milk (or chicken broth)
  •  1 TBSP flour
  • 1/2 tsp onion powder
  • 1/2 tsp garlic powder (not salt) or 2 cloves garlic
  • 4 TBSP pesto
  • juice from 1 lemon
  • 1/3 cup Parmesan cheese
For pasta:

  • olive oil
  • 1 clove garlic
  • 1 TBSP Italian bread crumbs
  • 1 cup grape tomatoes
  • 1 lb. cooked pasta
  • Pasta water or milk to thin sauce
  • Parmesan cheese for topping
DIRECTIONS:

Preheat oven to 425.  Put on water for pasta (salt it well) and a pan for steam the asparagus stems.  Clean asparagus and cut of the spears and place the spears on a baking sheet.   Cut off the other end stalky part (I see where it breaks naturally and cut the rest about that length.)
For the sauce:  Discard stalky ends and place the other stems in steam basket.  Steam for about 15 minutes, or until very tender and no longer bright green.  Place stems in blender with milk, flour, pesto, onion powder and garlic powder and lemon juice.  Puree until smooth.   Place in pan and heat over low.  Add Parmesan cheese just before right about when pasta is cooked.

 While the stems are steaming, drizzle the spears on the baking sheet with a drizzle of olive oil, some salt and pepper and one clove of fresh garlic.  Toss and place in preheated oven for 10-12 minutes.  Remove from oven (cook pasta here). Sprinkle spears with bread crumbs. Add tomatoes to baking sheet (drizzle with oil, salt and pepper them) and return to oven for 5 more minutes.
Dump pasta and sauce together and stir.  Add veggies and stir until combined.   Sprinkle with  some more Parmesan cheese.

Tuesday, May 15, 2012

TWD: BWJ- Pecan Sticky Buns

TWD: BWJ PECAN STICKY BUNS


The thought of making sticky buns really appealed to me.  I have made homemade cinnamon rolls many times and enjoy the process and LOVE the result.  I was excited--  until I read the recipe.  The recipe with 5 sticks of butter.  5 STICKS!  If I ate one, would I die of a heart attack immediately?
 This following the shortbread bars with a fat pound of butter from my last TWD: BWJ.

I made the Brioche, having to add a bit more flour to the dough to get the slapping sound she spoke of.  In the fridge overnight.  Next day I added more butter, made the rolls and froze them.  Next morning, (Mother's Day, poor planning on my part) I got up at 6 to cut the buns and put them into the pans to rise.  I planned on bringing them to church to share, seeing how I  knew it would be too many for even us to eat (nor did I want us consuming all that butter alone.)  I got 18 rolls, instead of 14.

They rose beautifully.  Into the oven for 35 minutes, and out of the pan onto a plate (with butter sloshing out as I turned it over).  They looked gorgeous and looked really delicious and they smelled amazing.
I had about 1/3 of one.   I figured out they have 25.5 grams of fat (32 grams if you make 14) and 226 calories (290 calories for 14 buns) from the butter alone.  Not to be a buzz killer, but that kinda killed my buzz.  There are just too many yummy things out there that don't have that much butter.  Desserts even.  I am not sure if I have ever used that much butter except when I am doing huge batches.  And if it ain't chocolate... need I say more?
You can see all the folds from the butter that was added.

I had about 1/3 of one (8 grams of fat from butter).  They were very tasty.  I mean, come on!  Everyone knew they would be! But honestly, I prefer my normal cinnamon roll recipe.  And they kinda taste like monkey bread (someone asked me if it was monkey bread), which is WAY easier to make.

On the upside, they were very pretty and I even kinda enjoyed parts of the lengthy process to get these little sticky buns made.  On the downside, though I am feeling bad for complaining, I couldn't enjoy them because they were just a bit too much.  Blame it on hormones or something.
If you want to try these, and no aversion to obscene amounts of butter (I know, I know... let it rest already!), you can find the recipe at our hosts websites.  Thanks to Nicole and Lynn for hosting!

Wednesday, May 9, 2012

Slutty Brownies


Before you get all upset with me for the inappropriate title, I didn't name these brownies.
Okay, it has been forever since my last blog.  I have like 10 recipes or more to blog, but I am so in the weeds.  I started going to the gym for an hour and a half every day a few weeks ago.  That combined with life= blog suffering.  Can I just say I cannot wait for the school year to be over?  I am ready.  And exhausted.  And I seem to be on some sort of griping session.  Blah, blah, blah!

 So, I made these like 2 weeks ago and they were rich, gooey and amazing.  Best the day made for sure.  And these did not last much longer than that.  My mom has made them twice.  I will post the recipe I made, but you could easily use store bought refrigerated cookie dough and a brownie mix instead.  Note-  these brownies are slutty... they won't make you that way.  Hopefully, anyhow.  Enjoy!


SLUTTY BROWNIES
slightly adapted from: tastykitchen

INGREDIENTS:

FOR THE BROWNIE LAYER:
  • 10 Tablespoons Unsalted Butter
  • 1-¼ cup White Sugar
  • ¾ cups Cocoa Powder
  • ½ teaspoons Salt
  • 2 teaspoons Vanilla Extract
  • 2 whole Eggs
  • ½ cups Flour
 
FOR THE COOKIE DOUGH LAYER:
  • 1 cup Butter
  • 1 cups Brown Sugar
  • 1 cup White Sugar
  • 2 whole Eggs
  • 2-½ teaspoons Vanilla Extract
  • 2-½ cups Flour
  • 1 teaspoon Salt
  • 1 teaspoon Baking Soda
  • 1 teaspoon Baking Powder
  • 2 cups Semi-Sweet Chocolate Chips
  •  
  • 1 package Oreo Cookies, 15 Ounce Package
DIRECTIONS:
 For the brownie layer:
In a medium-sized sauce pan, melt the butter over medium high heat. Add the sugar and cocoa powder once the butter is melted. Whisk to combine and remove from heat. Add the salt, vanilla and eggs and continuously whisk until the eggs are combined. Add the flour and continue to mix. Set batter aside.

For the cookie dough layer:
Cream together the butter and sugars using a mixer. Add the eggs and vanilla, making sure to scrape down the sides of the mixing bowl. Add the flour, salt, baking soda and baking powder and mix on low until everything is incorporated. Fold in the chocolate chips. Set dough aside.
For the assembly:
Preheat the oven to 350 F.
Line the bottom of a 9×9 (I used a 9x13) baking pan with tin foil and then spray the tin foil with a layer of baking spray.
Layer half of the cookie dough on the bottom of the prepared baking pan, pressing down to form the bottom of the Slutty Brownies. Reserve the remaining cookie dough to be used to make cookies later in the day.
Layer as many Oreos as you can on top of the cookie dough. No need to overlap. One single layer will do.
Pour the brownie batter on top of the Oreo layer and make sure it’s spread evenly on top.
Bake for 30-35 minutes. Test with a knife to see if the center is done. If the knife comes out clean, then remove the pan from the oven and let the brownies rest before serving. If the knife comes out with batter still on it, allow the brownies to bake about 5 minutes more. 
Serve with ice cream and/or lots of milk!!

Tuesday, May 1, 2012

TWD: BWJ Hungarian Shortbread


I debated on whether I wanted to make this recipe.  First off, I am not a huge shortbread fan.  Even sweet shortbreads are kinda MEH! in my book.  The second is I am not a huge rhubarb fan and this stuff had a layer of it in the middle.  And third, because this thing has a pound of butter.  I like butter, don't get me wrong, but a whopping 4 sticks would about send anyone over the edge.


  Again, commitment and resolve enter the picture.  Push through the pain.  Do an extra spin class at the gym for that one taste test bite.  And seriously, you know I am committed if you have ever done spin class.  I am sure it is somewhere in the classification of torture.

Super simple recipe.  I mean, seriously easy.  I jazzed up the shortbread by adding the zest of a lemon and 1 tsp of lemon extract because I love lemon with fruit stuff.  And I thought it needed way more fruit, so I almost doubled the amount called for.  I did it in a 9x13, half blackberry/raspberry and half strawberry/rhubarb jams.


So, the verdict.  First bite... slather it on the thighs.  The next bite, right in the gut!... you get the picture.  Was it good?  Was it worth it?  Um.. yeah.  I didn't want to like it.  I really didn't.  But. I did. Sigh.  By the way, the lemon was perfect in it.  And I cooked mine for 45 minutes, not 40. 

Thanks to our lovely hosts Lynette and Cher for hosting.  Check out the recipe and their great pictures on their sites.