Thursday, April 26, 2012

Chicken Enchilada Pasta


I love carbs.  My feeble, narrow-mind cannot grasp how someone could do any kind of diet that made one give up carbs.  I simply could not.   And gluten-free...  I admire all those out there who eat gluten free. I just don't think I could.  I mean, perhaps if a doctor told me I would die if I ate them.  Maybe, just maybe, I could then.  But no guarantees.

I saw this on pinterest, and a friend of mine who has a fab food blog also made a version of this.  I must say...  it is a-mazing.  A little spicy, but doable for a sensitive palette like mine and my kids.  The flavors were robust and just plain good. I even munched on the leftovers cold. 


CHICKEN ENCHILADA PASTA

INGREDIENTS:
  • 2-3 chicken breasts, cooked & shredded (I did beer crock pot chicken)*
  • 2 tbsp. olive oil
  • 3 garlic cloves, minced
  • 1 medium onion, diced
  • 1 red pepper, diced
  • 1 {4 oz.} can diced green chiles
  • 1/2 tsp. salt
  • 2 tsp. chili powder
  • 1 tsp. cumin
  • 2 {10 oz.} cans red enchilada sauce
  • 2 cups shredded cheese {I used cheddar & smoked gouda}
  • 1 cup light sour cream
  • Penne pasta (I use Barilla plus or whole wheat)

Optional toppings:
Avocado
Green Onions
Black Olives
Tomatoes
Sour Cream (I used fat free Greek plain yogurt)

DIRECTIONS:
*Place chicken in crock pot (I did 4 breasts, used 2 for this and 2 for quesadillas a few days later).  Add 1 cup dark beer and 2 TSBP taco seasoning taco-seasoning for 4 hours on high or 6 hours on low {or shred your rotisserie}.  
Chop the veggies.  Place 2 TBSP olive oil in a large skillet.  Add onion and the red pepper and cook about 3-5 minutes.  Add garlic and cook for another 3-5 minutes. 

Add green chiles, cumin, chili powder, salt, & enchilada sauces.  Let sauce simmer for about 8-10 minutes.  Boil pasta according to package directions here.

Add cheese and stir until the cheese is melted and heated through.  Now toss in the sour cream, but whatever you do, DO NOT bring to a boil! Cook on low heat or the sour cream will curdle.  Add chicken.   Let warm over low until it is all warm throughout.
Drain pasta and mix with sauce.  Serve and garnish with avocado, tomato, green onion, and a dollop of sour cream.

Monday, April 23, 2012

Pumpkin Spice Waffles


I am going to keep this short, because frankly, I am getting tired of typing and have to feed my kids some lunch.  These waffles are easy, so good, and makes a ton, so you can probably freeze some (unless you are feeding a small army, like me :-).  You can even make them when you are half asleep, like I did.  And if you want to take some really awful pictures of them, like I did, great!  Have at it!  But do make sure you eat a few.


PUMPKIN SPICE WAFFLES

INGREDIENTS:
  • 2 1/2 cups flour
  • 1 1/2 TBSP baking powder
  • 1/2 tsp salt
  • 1 tsp cinnamon
  • 1/2 TBSP pumpkin pie spice
  • 1 cup pumpkin
  • 3 TBSP butter, melted
  • 3 TBSP brown sugar
  • 2 eggs, lightly beaten
  • 1 tsp vanilla
  • 2 cups milk
DIRECTIONS:

Whisk together flour, salt, baking powder, cinnamon and pumpkin pie spice.  Add melted butter, brown sugar, vanilla and eggs.  Whisk just a tiny bit.  Add the milk and whisk until you can't see any more flour.  Use a measuring cup or ladle to put on waffle iron.  Let cook until a deep golden brown.  Top with syrup, and pecans, or berries and whipped cream (and syrup).

Triple Chip Chocolate Cookies


I love making cookies.  They come together in like 2 minutes (okay, like 10, but I love to exaggerate) and they are liked by everyone.  Okay, men, stop reading, or skip to the recipe.

I am so PMSing....  like I wish I could live in a house made of dove chocolate with reese's peanut butter cup trim, and eat my way out.  And I seriously do not think I would get sick.  Or maybe just dunk my head in a vat of chocolate fondue.  Or maybe I should mix some brownie mix, and eat the batter by the spoonful.  ARGH!

Anyway, these cookie are great.  I could eat like 10.  I am limiting myself to 1 at a time though.  Per minute. . . . in a ten minute period.  Gotta pace myself.  Whew!
They are YUM...  make some.  You will be glad you did.


TRIPLE CHIP CHOCOLATE COOKIES
yield: about 40 cookies

INGREDIENTS:
  • 2 1/4 cups flour
  • 1/2 cup dark cocoa powder
  • 1 tsp baking soda
  • 1/2 tsp salt
  • 1 cup  (2 sticks) butter, softened
  • 3/4 cup brown sugar
  • 3/4 cup sugar
  • 2 eggs
  • 1 TBSP vanilla
  • 1/2 cup white chocolate chips
  • 1/2 cup peanut butter chips
  • 1 cup semi-sweet chocolate chips
DIRECTIONS:

Preheat oven to 350.  Line 2 cookie sheets with parchment or silicone liners.  In a medium sized bowl, whisk together flour, cocoa powder, baking soda, and salt.  In a large bowl, working with a mixer, mix the sugars and butter for about 2 minutes, scraping down bowl as necessary.  Add one egg and beat a minute, add the other and beat another minute.  Add vanilla and beat about 30 seconds or so, scraping down bowl.  Mix in flour with mixer until just combined and incorporated.  Batter will be thick and fudgy.    Mix in chips with a spatula.  Using a cookie scoop, or spoons, drop 9-12 cookie in rounded tablespoons onto the parchment lined cookie sheets.  Bake 9-12 minutes, or until just set.  Remove from oven and let sit on cookie sheet a few minutes and remove to cooling rack.  Enjoy!

Taco Seasoning


Lately, I have been becoming increasing aware of all the junk I put into my body.  Now, I am not talking all the baked goods I make.  Those are a different kind of junk.  But seeing how I make almost everything from scratch, I know what the junk is.  I am talking about the junk that I don't even realize I am putting into my body.   High fructose corn syrup for instance.  It is in everything.  And they say it is BAD!  I know sugar is bad too, but the high fructose is bad like sugar on steroids.  So, I am checking labels more and more.   I have not really read a packet of taco seasoning. But I always bought the low sodium, thinking it would be a little less bad for me.  
 

Maltodextrin is the first ingredient in one popular packet.  The stuff is a white powder that our body processed like glucose.  In taco seasoning?  Seriously?  WHY?!?  And then there is partially Hydrogenated Soybean Oil, which we all know is the devil of oils.  And then they add Silicon Dioxide, which is an anti-caking agent.  If they skipped the oil, maybe they could skip that junk.  And then BHT or another preservative.  BHT has been linked to cancer.  Seriously, if they just used good old fashioned spices, they would not need all the other crap (breaking out the "curse" words!).   And modified corn starch.  Why does corn starch need to be modified?!?!  UGH!!  Okay, my soap box is complete. 

This is no fillers.  So you don't need quite as much volume as you would from the taco packets.  This takes less than five minutes to throw together and you can feel better about one thing that you are feeding your family.   So make it.  Like today.


TACO SEASONING

INGREDIENTS:
  • 4 TBSP chili powder
  • 1 tsp granulated garlic or garlic powder
  • 1 1/2 tsp onion powder
  • 1/2 tsp red pepper flakes
  • 1 tsp oregano
  • 1 tsp paprika
  • 1 tsp smoked paprika
  • 2 TSBP cumin
  • 4 tsp salt
  • 3 tsp pepper
  • 1/2 tsp chipotle chili pepper
  • 2 TSBP minced onion
DIRECTIONS:  

Dump them in a bowl and mix with a whisk or put a lid on and shake.   Store in a spice jar or airtight container.  Use 2 TBSP in place of taco seasoning packet, depending on how much spice you want.  If you are making good old fashioned tacos, don't forget to use 1/2 cup or so of water when you add the spices to make it good and saucy, like me.  You can also add a sprinkle of cornstarch as a thickening agent when you add the water and spice. 


Thursday, April 19, 2012

Creamy Chicken Picatta Pasta


So, I got sick of screaming at my kids  to leave  me alone when I am trying to exercise, and joined the YMCA.  I do feel a bit guilty dropping 4 kids in there at once.  For more than one reason.  First, I could barely leave my kids in nursery for church.  Separation anxiety.  Mine.  Part of the reason I homeschool.  Also, I did some quick calculations...  and per hour I am paying next to nothing for the child care.  I have done 2 classes per day since Tuesday...  last night, while changing for bed, I almost had to ask for help getting my shirt off because I could barely lift my arms to get it off.  Then I thought about it and thought my husband might think I was feeling frisky.  Nope.  I suffered through and did it myself.  Maybe tonight I will just sleep in my clothes.  Changing clothes for bed is overrated.

 To the food.  I saw a recipe on Pinterest for this type of dish and it looked so good.  I live all things lemon, and I had some lemons I had zested for baking.   Although the other dish looked great, it called for grilling the chicken.  It is too hard to grill and do all the other moving parts while on my own.  And most nights, I am cooking solo.  So, I whipped up my own version.  This was a fairly quick and tasty dish.  Loved that I can pair it with pasta. 


CREAMY CHICKEN PICATTA PASTA

Ingredients

  • 2 tablespoons extra-virgin olive oil
  • 3 boneless skinless chicken breasts, cut into 1-inch pieces
  • Salt and pepper 
  • 1/2 cup flour
  • 1 1/2 tablespoons butter
  • 4-5 cloves minced garlic
  • 2 shallots diced
  • 2 tablespoons all-purpose flour
  • 1/2 cup white wine
  • 2 lemons, juiced 
  • zest of one lemon
  • 1/2-3/4 cup cream  (I eyeballed it)
  • 3 tablespoons capers, drained
  • 1/4 cup fresh parsley, chopped
  • 1/4 cup basil, chopped
  • 1 pound pasta, cooked to al dente 
  • Parmesan cheese
  • 1/2 cups reserved pasta water, or chicken broth (to thin)

DIRECTIONS:

Take 1/2 cup of flour and season with salt and pepper.  Heat a large nonstick skillet over medium high heat. Add a tablespoon of extra-virgin olive oil.  Let the oil get hot while you toss the chicken pieces in the 1/2 cup of flour and the chicken to the pan.  Cook chicken until lightly golden all over, about 8-10 minutes.  sprinkle with zest, stir and remove chicken from pan and return the skillet to the heat. Reduce heat to medium. Add another tablespoon extra-virgin olive oil and 1 tablespoon butter, the garlic and shallots to the skillet. Saute garlic and shallots for about 2-3 minutes, until shallots begin to soften. Add 2 TBSP flour, whisk and cook 2 minutes. Whisk in wine and lemon juice. Stir in capers and parsley. When the sauce begins to bubble, add cream remaining 1/2 tablespoon of butter.   Add chicken back to the pan and heat through, 2-3 minutes. Toss hot pasta with chicken and sauce, adding broth or pasta liquid to thin sauce.  Add handful of Parmesan cheese, stir and serve. Top with more cheese.

Tuesday, April 17, 2012

TWD: BWJ- Lemon Loaf Cake


LEMON LOAF CAKE

I had made a meyer lemon bread about 2 weeks ago.  So, I was looking forward to making this so I could compare.  I read the description of the bread and thought it sounded great.  She described it as a kind of pound cake.  I whipped it up in no time and I added 1/2 tsp. of both vanilla and lemon extract for good measure.  I then made a homemade glaze, using 1 TBSP melted butter, about a cup of powdered sugar and the juice of one of the lemons.  I then added 1/2 tsp of lemon extract to that.

Waiting for it to cool enough for the glaze was a bit painful.  I persevered.  I drizzled.  I waited again.  Man, I hate waiting.  Especially when the whole house smells of lemon.  I cut.  I take my photos.  (Are you one the edge of your seat?  Riveting stuff, I know.)  The texture seems lovely, like a pound cake.  I bite.  I am disappointed.  It was spongy.  Not sure where I went wrong, but was not a fan.   I know I didn't mix too much... followed the directions.  I just loved the crumb of my lemon bread so much more (more delicate and so much more moist.)

Now, don't get me wrong.  The whole thing was gone in a day.  A family of 6 will do that.  We topped it with strawberries, and it seemed better that way.  The amount of lemon flavor was great.  Just a texture thing.  If you want to try it out, check out our hosts pages or the cookbook, pgs. 251-252 in Baking with Julia.  Thanks to Truc and Michelle for hosting.

Saturday, April 14, 2012

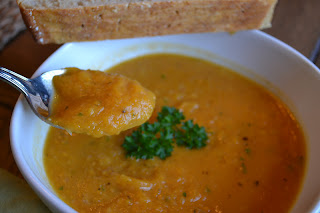
Roasted Garlic and Sweet Potato Soup

 This was one of those recipes I was a bit unsure of.  I did wonder how the combination of nutty roasted garlic could be bad, but just wasn't sure.  Besides being very simple, extremely good for you, and easy, this soup was very tasty.  It reminded me of the carrot soup I make.  The nuttiness of the roasted garlic against the sweetness of the sweet potato was a winning combo. 

This is a very versatile soup as well.  Not a fan of thyme, no problem, try some warm cinnamon.  Or some curry powder.  Maybe some nutmeg.  Lots of possibilities.  

This soup was gone in one sitting.  There was what I would call a sampling left, which I attempted to have for lunch the next day.  And my daughter mooched half of.  Little stink.

 If you are trying to eat healthy, there is not much better than a soup like this.  If you are not trying to eat healthy, have some dessert after you eat this soup. 

ROASTED GARLIC AND SWEET POTATO SOUP

adapted from: tasteofhome

INGREDIENTS:

  • 2 whole garlic bulb
  • 3 tsp olive oil, divided
  • salt and pepper
  • 2-1/2 pounds sweet potatoes (about 4 large), peeled and cut into 1/2-inch slices
  • 1 large or 2 normal sweet onions, cut into wedges
  • 1 box reduced-sodium chicken broth, divided
  • 2 TBSP minced fresh parsley
  • 1 TSBP minced fresh thyme or 1 tsp dried thyme
  • 1/4 tsp salt
  • 1/8 tsp pepper
  • herbs de provence

DIRECTIONS:

Remove papery outer skin from garlic bulb (do not peel or separate cloves). Cut top off bulb; brush with 1/2 teaspoon oil. Sprinkle with salt and pepper.  Wrap in heavy-duty foil.
Place sweet potatoes and onions in a 15-in. x 10-in. x 1-in. baking pan coated with cooking spray. Drizzle with remaining oil; toss to coat.Sprinkle with herbs de provence and some salt and pepper.
Bake garlic and vegetables at 425° for 30-35 minutes or until tender. Cool for 10-15 minutes.
Place 1-1/2 cups broth, parsley, thyme, salt and pepper in a blender. Squeeze softened garlic into mixture; cover and process until smooth.  Place in pan.  Add sweet potatoes and onion to blender with remaining broth and blend until smooth.  Place in pan with garlic and mix well.  Heat until warm through.  Serve with warm bread or crackers.

Chocolate Chip Cookie Dough Peanut Butter Cups


I know, right?

My cousin Michelle sent me this recipe.  They looked so yummy, but I had to wait for a block of time to be able to make them.  And especially so I could sit and watch talk shows with my bon-bons (picture the Cookie Monster meets Bridget Jones).  Because that is what I do all day.  Sit, watch talk shows and stuff my face. Uh-huh.  And I live in Neverland for part of the year.

Yeah, all that, plus these had more of those stages I am so terrible at.  Waiting, chilling, chilling more...  BAH!!  Anyway, these little things took a fair amount of time, though really quite easy.  And the result is wonderful.  They are kinda like Reese's peanut butter cups, or maybe a bit like buckeye's.  The kids love them and even my husband, who is not a fan of Reese's (I know, unbelieveable and insane) said he likes them.


Were these little suckers worth the effort?  Why, thanks for asking.  Sure were!


CHOCOLATE CHIP COOKIE DOUGH PEANUT BUTTER CUPS 
adapted from howsweeteats

INGREDIENTS:
makes 24 cups

  • 2 1/2 cups milk chocolate chips
  • 1 tsp crisco, divided
  • 1/2 cup unsalted butter
  • 1/3 cup packed brown sugar
  • 1 teaspoon vanilla extract
  • 1/4 cup creamy peanut butter
  • 3/4 cup powdered sugar
  • 4 tablespoons all-purpose flour
  • 1/2 cup mini chocolate chips
DIRECTIONS:
In a small saucepan, heat butter until melted. Whisk in brown sugar, bring to a boil and let it bubble for 1-2 minutes. Remove from heat and whisk in peanut butter. The mixture will be runny. Whisk in vanilla. Let sit and cool completely, about 20 minutes.
Line a mini muffin with with liners (the silicone ones works really well). Melt 1 1/4 cups of chocolate chips with 1/2 tsp crisco (I do mine in the microwave, heating on full power for 20 seconds, stir, 30 seconds again, and stir until melted). Drop 1/2-1 teaspoon of chocolate into each liner, then use a pastry brush to brush chocolate up the sides of the liner. Place in the freezer for 20 minutes. By this point the butter/sugar mix should be cool. Whisk in powdered sugar and flour, until combine and few lumps remain. Fold in mini chocolate chips. The dough will be wet, but pop it in the fridge for 15 minutes to harden.
 Remove muffin tin and cookie dough, then place 1 teaspoon of cookie dough (I mashed mine) into the chocolate cups. Melt the remaining chocolate chips with 1/2 tsp of crisco, then cover each cookie dough top with chocolate, smoothing with a spoon. Freeze again for 15-20 minutes. These are fine out in room temperature for a few hours (they may soften a bit) but are great out of the fridge.

Oatmeal Chocolate Chip Cupcakes with Cinnamon Sugared Chip Oatmeal Frosting


That title is a mouthful, huh?  Maybe symbolic. . . of the mouthfuls of these cupcakes I have eaten.

It has been a week since I have blogged!  I am realizing I am doing a lot of things not so well, i.e.- homeschool, blogging, housekeeping, etc...  and Mr. Delectable was off some of this week, so not much got done.  So, what to do when you realize you are failing at everything.  Cut something out and still fail.  Yeah, winner here.

I saw these cupcakes a few weeks ago and knew I wanted to make them.  For some reason, in my head I thought the icing had oatmeal, so when I saw it didn't, I missed it.  So I added it, and I loved it. The original icing recipe was also too buttery for me, so I added more powdered sugar.  Perfect.


The cupcake is more like a cakey cookie...  so like a cookie cup.  Upon eating my 3rd one of these (actually, I only had 1/2 the first, and a bite of the second, but still, a bit gluttonous) I decided they taste a lot like Little Debbie oatmeal pies.  I really enjoyed these cupcakes, and would make them again. 


CHOCOLATE CHIP OATMEAL CUPCAKES
from: howsweeteats
makes 12 cupcakes

INGREDIENTS:
They get a deep brown from the brown sugar.
  • 1 large egg
  • 3/4 cup loosely packed brown sugar
  • 2 teaspoons vanilla extract
  • 1/2 cup unsalted butter (1 stick), melted and cooled
  • 1 1/4 cups all-purpose flour
  • 1/2 cup old-fashioned rolled oats
  • 1 1/4 teaspoons baking soda
  • 1/4 teaspoon salt
  • 1/4 teaspoon cinnamon
  • 2 tablespoons milk
  • 1/2 cup chocolate chips, tossed in a sprinkle of flour

DIRECTIONS:
Preheat oven to 350 degrees F. Line a cupcake tin with liners.
In a large bowl, whisk egg and brown sugar together until combined, and no lumps remain. Add vanilla extract and butter, whisking until smooth. Add in flour, oats, baking soda, salt and cinnamon.  Add in milk and stir until combined and smooth. Fold in chocolate chips. Drop about 1/4-1/3 cup of batter into each liner, or use a cookie scoop. Bake for 20-30 minutes, or until cupcakes are set and spring back at the touch. Let cool completely before frosting.

CINNAMON SUGARED CHIP OATMEAL FROSTING
Adapted from: howsweeteats
  • 1 cup unsalted butter (2 sticks), softened
  • 3 1/2 cups powdered sugar
  • 1/2 cup loosely packed brown sugar
  • 1/4 teaspoon cinnamon
  • 1 tablespoon vanilla extract
  • 1 tablespoon of milk, if needed
  • 1/2 cup oatmeal
  • 1/3 cup mini chocolate chips

DIRECTIONS:
Beat butter in the bowl of an electric mixture until completely smooth and creamy. With the mixer on low speed, add in powdered sugar slowly. Gradually increase mixer speed and add brown sugar and vanilla, then beat for 2-3 minutes, scraping down sides and bottom of the bowl. If frosting is too thick, add milk 1 teaspoon at a time until desired consistency is reached If it’s too thin, add sugar gradually until it thickens. Fold in chocolate chips, and oatmeal.  Frost cupcakes. Extra frosting can be stored in the freezer for about 6 weeks.This recipe could probably be halved for these cupcakes and there would be enough.

Saturday, April 7, 2012

Pudding Pops


I loved pudding pops growing up.  Seriously great memories of devouring the things growing up.   Now, it is such a sad thing, they seem no where to be found.  I looked online and found a recipe.  Now here is the disclaimer. . .  these are NOT the pudding pops of old.  And I did not like them as well.  However, they were a delightful little treat and my kids all loved them.  They were finished, each and every one, which is kind of a miracle, because there is almost always one kid who doesn't like something and doesn't finish it.  Anyway, this is hardly a recipe because it is so simple.  It will take about 5 minutes to make it, and makes about 10 of these little pops.  Not a replacement for the pudding pops of old, but will suffice.

PUDDING POPS

INGREDIENTS:

  • 3 oz. package of chocolate or vanilla pudding
  • 1 1/2 cups milk (I used skim)
  • 2 cups cool whip (I used lite)
DIRECTIONS:
Whisk together milk and pudding until slightly thickens.  Fold in cool whip, until all the same color.  (Cool whip helps it not to crystallize).  Divide between popsicle holders (or use old individual yogurt containers, cover with saran wrap and stick a popsicle stick in the center).  Freeze.  To release, squeeze the outside of popsicle container and tug gently at stick to break suction and release.

Friday, April 6, 2012

Buffalo Chicken Fajita Pitas (Hacky Sacs)


When we lived in Germany, and my husband was brand new to the army, we were invited to his bosses house for dinner.  His boss was a military intelligence Captain in the army, and I was so intimidated.  We went and he prepared this for us.  It was an odd dinner, in that he did these in single batches, so we kind of ate one at a time.  He told of his family had a restaurant and these "Hacky Sacs" were made there, and he was only accustomed to making one at a time.  I watched him carefully as he prepared them.  They were pretty spicy in that he used hot sauce verses the buffalo wing sauce.  He also used tri-color peppers which made it so pretty.  I remember being so embarrassed because my nose was running from the heat of the hot sauce.  But they were so delicious.  The chicken stays melt in your mouth tender from the milk.

I make these in batches too.  One for the kids and one for us.  But I have made them ever since he made them for us.  They are really a complete meal in of themselves, but I used to serve them with a warm pasta salad.  The measurements are rough, as I tried to measure it last time I made them, but normally I do not measure anything.  It is all by eye and to taste.  So feel free to add more of anything, including milk, as you may need more as it is cooking.

BUFFALO CHICKEN FAJITA PITAS

INGREDIENTS:
  • 3 large chicken breasts
  • salt and pepper 
  • 1 red pepper, sliced thin
  • 1 large sweet onion, sliced thin
  • 8 oz. sliced mushrooms
  • 1/2 cup flour
  • 2 TBSP butter (divided)
  • 1 tsp Greek seasoning (divided)
  • 1/2 cup milk (divided)
  • 1-2 TBSP Frank's red hot (divided)
  • 1/2 tsp Oregano (divided) 
  • 6 pitas, halved
  • 6-8 ounces Monterey jack cheese, sliced
  • garnish sour cream
DIRECTIONS:

Cut chicken into small chunks.  Mix flour, salt and pepper in a small dish.  There will be 2 batches of this dish.  Preheat a large nonstick skillet over med.-high heat.  Place 1 TBSP butter in pan. Drudge half the chicken in the flour mix, shake off excess and place in pan.  Cook to brown one side, turn over and add half of the sliced onion and pepper to pan.
This was 1/2 the veggies and some sliced cheese.

 (Deglaze with a tiny bit of chicken broth or milk, if sticking).  Reduce heat to medium.  Sprinkle with 1/2 the Greek seasoning, oregano, and continue to mix as needed. Add red hot.  Cook for about 7 minutes, deglazing with 1/4 cup of milk as you cook.  Add 1/2 of the mushrooms and cook until chicken is cooked through and mushrooms are cooked.  Taste and add more red hot if you want more heat.  While it is cooking, slice the cheese into 1/4" thick slices and place in halved pitas.  Add chicken and a dollop of sour cream.  Repeat the whole process for the second batch. 

Homemade Macaroni and Cheese


I think everyone has a go to mac & cheese recipe. This is mine.  It is creamy and has layers of flavor that give it a little interest.   This is one dish that we all agree on, it is poundable.  And don't eat too much, because it could add pounds. ;-)
I won't babble on this post... not a whole lot to say honestly (I know.  And yes, I am feeling just fine..).  Good eats. 


HOMEMADE MACARONI AND CHEESE

INGREDIENTS:
  • 1 lb. elbow macaroni, whole wheat or barilla plus
  • 2 cups milk
  • 3 TBSP butter, divided
  • 2-3 TBSP flour
  • 1 sweet onion, diced and caramelized (or 1/2 tsp onion powder)
  • olive oil for cooking onion 
  • 1/4 tsp nutmeg
  • 1/2 tsp dry mustard
  • 1/4 tsp paprika
  • 1/2 tsp salt
  • fresh ground pepper
  • 1 cup diced velvetta (I know, it is nasty, but it makes it creamy)
  • 3 cups shredded sharp cheddar (Cabot white is wonderful in this)
  • 1/2 cup Italian breadcrumbs
DIRECTIONS:

Preheat oven to 350.  Cook pasta al dente, or with a bit of bite.  Meanwhile, in a large skillet or saucepan, over medium high heat, cook onion until soft, browned and sweet. Push onion to side of pan.  Add 2 TBSP butter to pan.  Add flour to make a roux.  Cook for 30 seconds to a minute.  Slowly add 1/2 the milk, whisking as you add it.  Whisk to remove lumps and add remaining milk.  Reduce heat to med/ med-low.  Add spices.  Cook for about 5 minutes, until slightly thickens.  Add velvetta and mix until melted.  Add shredded cheese and mix until melted and smooth.  Spray a casserole dish or 9x13 with cooking spray.  Place cooked pasta in dish.  Pour cheese sauce over and mix to cover pasta evenly with cheese sauce.  In a small pan, melt butter and mix with breadcrumbs.  Sprinkle breadcrumbs over the top of the macaroni.  Bake for 30 minutes, until bubbly and breadcrumbs are toasted.

Smashed Chickpea and Avocado Veggie Sandwich


I am one of those weird people who genuinely love veggies.  Not sure where I came from, or why, but I just enjoy them.  I also love veggie sandwiches.  They are my eight year old's favorite too. I know, I have weird children.  They take after their mother and father.  And not much gives me more satisfaction than feeding my kids healthy meals and veggies.  I know, get a life, right?  But it is the little things.  

 Anyway, this was a yummy lunch and I felt great about eating and serving it.  Super easy and pretty quick lunch that you can feel great about eating.


SMASHED CHICKPEA AND AVOCADO VEGGIE SANDWICH

 adapted from twopeasandtheirpod 

Yield: Salad for 3-4 sandwiches


INGREDIENTS:
  • 1 (15 ounce) can chickpeas or garbanzo beans
  • 1 large ripe avocado
  • 1/4 cup fresh cilantro, chopped
  •  2 tablespoons chopped green onion
  •  Juice from 1 lime
  •  Salt and pepper, to taste
  • splash vinegar
  •  Bread of your choice (I use whole wheat bread)
  •  Fresh spinach leaves and other sandwich toppings: lettuce, tomato slices, sprouts, red cabbage etc.
DIRECTIONS: 
Drain and rinse chickpeas.  Can remove little skins of leave them.  I left them as they don't bother me.  Mash chickpeas with potato masher or fork.  Add avocado and continue mashing until consistency you desire.   Add lime juice, salt and pepper, cilantro, green onion and a splash of vinegar.  Taste for seasoning.  Spread on bread and load with veggies.  Enjoy!

Tuesday, April 3, 2012

Meyer Lemon Loaf


I love lemon!!  Shouting it from the mountaintops...  or maybe just from the keys of my keyboard.   When I visited my grandmother and her husband "Papa Lou", my kids call him, in Florida a few weeks ago, he made his lemon salad.  It is made with meyer lemons and it is so good.  I will be posting that later... but I had this pack of gorgeous meyer lemons I bought at good ole Sam's, and couldn't let all that good zest go to waste.  Plus, I had some that were so juicy, I had to bake with it!

 I saw a meyer lemon bread on Pinterest a few days back, and thought it looked interesting.  I love lemon bread, and wanted to try the recipe.  However, I was too lazy, looked a few recipes and came up with this one out of those.  The loaf was so tender, almost like a cake crumb.  And the glaze, OH! the glaze.  Let's just say I was eating by the spoonful.  There is one slice of this bread left, which unfortunately I have to save for my husband.  Or I could eat all the evidence and pretend it never was...  hmm...  If you like lemon, this loaf will be gone by evening.

MEYER LEMON LOAF

INGREDIENTS:
  • 1 1/2 cups flour
  • 1/2 tsp baking soda
  • 1/4 tsp baking powder
  • 1/2 tsp salt
  • 1 cup sugar
  • 3 eggs
  • 1 stick butter, softened
  • 1/3 cup buttermilk
  • zest of 3 meyer lemons
  • 1/2 tsp vanilla
  • 1/2 tsp. lemon extract (I will use 1 tsp. next time)
  • juice of 2 meyer lemons
GLAZE:
  • juice of 1 meyer lemon
  • zest of 1 meyer lemon
  • 1 cup powdered sugar
  • 1/2 tsp lemon extract
  • 1 TBSP melted butter
  • 2 tsp. milk
DIRECTIONS:
Preheat oven to 350 and spray bread pan with baking spray, or butter and flour pan.  Whisk together flour, baking soda, baking powder and salt.  In a separate bowl, working with hand mixer, beat together butter and sugar for about a minute.  Add eggs, zest, juice and extracts.  (May curdle, don't worry, to be expected) Beat well.  Add buttermilk and beat. Add dry ingredients and mix until smooth and thickens a little, 30 seconds to a minute. 
Terrible picture, but I love how you can see all the lemon zest bits!

Pour into prepared pan and bake in the middle of oven for 40-50 minutes, or until toothpick comes out clean.  Let sit on wire rack for about 10 minutes and carefully remove from pan.  (Loosen sides with knife and shake pan from side to side to loosen bread).  Let cool about 15-20 minutes, and prepare glaze.  Melt butter, add extract, zest and lemon juice and whisk it sugar.  Add milk 1 tsp at a time, whisking, until ribbons for when you lift the whisk out.  You want it thick.  Pour over the bread and lick the spoon. Let set another 10 minutes so the icing will set a bit and enjoy!!

TWD: Baking With Julia- Pizza Rustica


This has pizza in the title, but this is not pizza in the traditional sense of the word.  I do like the rustica part of the title though.  Mostly because I like the word rustic. I was thinking this was going to be a difficult recipe, because I really do not enjoy rolling out doughs... not that I can't do it.  I just prefer the kind of dough I can go shopping with and get a fabulous pair of shoes.  But, I am a committed kind of girl.  This recipe called for prosciutto, so I knew there would be some adjusting that needed to be done, seeing how I am pork free kinda gal.  I know... pork rules, but just not in this kingdom.

I was concerned that I was not going to like this crust, with the sweetness of it.  I was a little leery of the whole thing quite honestly.  And I was just not in the mood to bake.  It could've had something to do with the fact that my kitchen was a complete disaster, or maybe that I was just in a generally bad mood.  Commitment kicked me in the pants, aggression taken out on the dough.

I followed the dough recipe pretty much, with the exception of using some whole grains, because I mix my flours in my canister.  The inside calls for ricotta, parsley, eggs, mozzarella and pecorino romano cheeses.  I was leaving out the prosciutto, so in place of it I added sun-dried tomatoes, spinach and roasted red peppers.  I used about 1/4 package of frozen spinach and squeezed it dry.  I also made sure the peppers and sun-dried tomatoes were dry.  I also used low fat ricotta or part skim.

So, the big taste test.  I really liked this little pizza rustica.  I enjoyed the slight sweetness of the crust against the savory inside (though next time I might cut the sugar back a little). We ate it warm, which may be a no-no, but the kind of requests, "wait 30 minutes to eat" or "eat at room temp." are rules just waiting to be broken in my opinion.  I liked it warm better than room temp anyway.  We shared with our neighbors, and they enjoyed it.  I would make it again, as it was really pretty easy and quick for something that looked so fussy.  I would love roasted green chilies in it.

One other note...  my kids are fantastic little eaters.  I mean, seriously, they beat out almost any other kids I have seen.  They were not too crazy about this.   They ate it, just complained a little about it.  I think this is a more mature kinda dish for a more mature palette.  This would be fabulous for a luncheon or a brunch.  We ate it for dinner, so it works for that too!
The recipe can be found on pages  430-431 of Baking With Julia, or on our lovely hosts websites.  Emily and Raelynn --thanks for hosting!