Saturday, January 28, 2012

Almond Joy-ful Waffles (Coconut Waffles)


So, laying in bed this morning... not wanting to get up.  I needed inspiration.  Coconut waffles-- a good reason for getting out of bed.  Dessert for breakfast anyone?  Seriously, after the first bite, I knew I was in for it.  These are super rich and decadent and one waffle did me.  My husband ate 3, but he always does.  My husband's favorite candy bar is almond joy, so these were inspired by him and perhaps that is why he was a human garbage disposal.

These smell A-MAZING when they come off the griddle.  Seriously.  And what better way to top them, then with some toasted coconut, and lightly toasted chopped almonds and chocolate chips, or maybe some warmed nutella?  Or maybe if you are having them for dessert, some coconut  ice cream and hot fudge.  That is so going to be dessert tonight!

I made some homemade whipped cream and we also put some strawberries on it, which made it a little bit healthy, right?  Actually, it did help offset the richness and sweet.
I may just dunk my head in some maple syrup and coconut tonight.


ALMOND JOY-FUL WAFFLES (COCONUT WAFFLES)

INGREDIENTS:
  • 2 cups flour (I used a mix of whole grain and white)
  • 1 TBSP baking powder
  • 1/2 tsp salt
  • 3 TBSP sugar
  • 2 whole eggs 
  • 1 egg white
  • 3 TBSP melted butter
  • 1 14oz. can light coconut milk
  • 1/4 cup milk
  • 1 tsp coconut flavoring
  • chocolate chips, toasted coconut*, and chopped almonds for topping
DIRECTIONS:

Whisk together dry ingredients.  Make a well in the middle of the dry ingredients and add the eggs (slightly beaten) coconut milk, coconut flavoring, milk and melted butter.  Whisk until all incorporated.  Placed on greased waffle iron and cook until a light golden brown.  *To toast the coconut, put on baking sheet under low broil, watching very carefully and turning once of twice, until golden.  Or you can use a pan over medium heat to toast it.

Thursday, January 26, 2012

Upside Down Apple Cake

        I saw this cake on pinterest.  Yes, I am addicted and have a problem.  
        So, I had to make it, of course!!  So glad I did!  I had a hankering to bake the other day. . .  been kinda slacking on this blogging thing.  So, I went through my mammoth book of recipes printed from the computer and found this little beauty.  So, a few apples, some caramel and dumping stuff in a bowl later, I got my cake and ate it too!  It is such a pretty little cake, and it tastes delicious.  Lick the caramel sauce off your plate good.  And an easy recipe that looks fancy.  Who doesn't love that?
          UPSIDE DOWN APPLE CAKE
          recipe slightly adapted from: kingarthurflour.com
          Topping:
        • 2 medium apples
        • 4 tablespoons butter
        • 3/4 cup light brown sugar, firmly packed
        • 2 tablespoons boiled cider or thawed apple juice concentrate
        • 1/4 teaspoon ground cinnamon
        • 1/2 cup light corn syrup
        CAKE:
        • 3/4 cup vegetable oil (I used a drained applesauce in the 3/4 cup and filled the rest with oil)
        • 1 cup brown sugar, firmly packed
        • 2 tablespoons boiled cider or thawed apple juice concentrate
        • 2 large eggs
        • 1 tsp vanilla
        • 1 1/2 teaspoons ground cinnamon
        • 1/4 teaspoon ground ginger
        • 1/8 teaspoon ground cloves
        • 1/2 teaspoon salt
        • 1 teaspoon baking soda
        • 1 1/2 cups Unbleached All-Purpose Flour
        • 1 large apple, peeled and finely chopped
        • 3/4 cup chopped pecans or walnuts, optional (I wished I had omited, perhaps put on top?)
        DIRECTIONS:

        For boiled cider:  Boil  1 cup cider for 15-20 minutes, until reduced by 2/3rds. (That's more than half ;-)

        Preheat the oven to 350°F. Lightly grease a 9" round cake pan at least 2" deep. Line the bottom with parchment, and grease the parchment.  Slice the top, including the stem, off one of the apples and set it aside before peeling and slicing the rest of the apples into 1/4" thick wedges.  Place the apple top, stem side down, in the middle of the pan, and overlap the rest of the apple wedges in a ring around it.
        Prepare the topping by heating the butter, sugar, boiled cider, cinnamon, and corn syrup together over low heat, stirring until the sugar is dissolved.  Pour 1/2 cup of the syrup mixture into the prepared pan, and set the rest aside.  To make the cake: Beat the oil, brown sugar, boiled cider, eggs, spices, and salt together for 2 minutes at medium speed.  Mix the flour with the baking soda, and stir it into the batter.  Add the chopped apple and nuts, and mix until just blended.  Drop scoops of the batter atop the apples in the pan, gently spreading to cover.
        Bake the cake for 45 to 55 minutes, or until a cake tester inserted near the center comes out clean.   Remove the cake from the oven, and run a thin spatula around the edge to loosen.   Let the cake cool in the pan for 5 minutes, then turn it out onto a serving plate, bottom side up. Scrape out any sauce that remains in the pan, and spread it over the cake.  Let it cool for a few minutes.  Reheat the reserved topping. If butter starts to separate as you reheat, add water by the teaspoon and stir until the butter rejoins the rest of the sauce.  Pour the sauce over the cake. Serve cake warm or at room temperature, with whipped cream if desired.
        Yield: 8 to 10 servings.

        Chocolate Nutella Pancakes


        Chocolate and Nutella, kinda redundant right?  Wrong!! Oh no, if we are doing chocolate for breakfast, we are doing it big.  So, what better way, than a chocolate pancake, with a big puddle of oozey goodness in the center.  Of course, there is that temptation to just eat the center of a bazillion pancakes.  Which I did momentarily think about, but refrained.
        You know, pancakes are really just an excuse to eat cake for breakfast.  But who needs an excuse?  Not me.
        As usual, I could not crank these out fast enough.  We topped with our usual: triple fresh berries, warm maple syrup and whipped cream.  Yes, we eat like this every Saturday.  Don't be a hater.

        CHOCOLATE NUTELLA PANCAKES


        INGREDIENTS:

        • 2 1/2 cups flour
        • 2 tsp. baking powder
        • 1/2 tsp baking soda
        • 1/3 cup cocoa powder
        • 1/2 tsp salt
        • scant 2 cups milk
        • 2 eggs
        • 3 1/2 TBSP melted butter or coconut oil
        • 1 tsp vanilla
        • 1/3 cup sugar
        • nutella
        DIRECTIONS:

        Whisk together flour, baking powder, salt and cocoa powder in a small bowl.  Whisk together sugar, melted butter, eggs, vanilla and milk.  Add dry to wet and whisk until combined.  Preheat griddle, and ladle pancake onto hot griddle.  Take a spoonful of nutella and place it in the center.  Cover it with a little more batter.  When pancake bubbles, flip and cook until cooked on the other side is done.  Serve with powdered sugar sprinkle and warm syrup.

        BBQ Chicken Pasta Bake


        My cousin Michelle, who must hate me, turned me onto a blog http://www.howsweeteats.com,  which has some fantastic recipes on it. I saw this recipe on there and could not get it out of my mind.  You know, you are eating something for dinner and really wishing it was something else... and fantasizing about food.  I had to face facts, I had to make it.  This meal is nothing ground breaking, and honestly, though it was completely delicious and I would totally (picture valley girl accent) make it again, it was not the best ever, rave like a lunatic, awesome.  It was delish and very poundable.  Like, you keep going back for more because you have no self control and you might, could possibly, still be hungry.  Yeah, that kind of meal.  My kids also really liked this meal, aside from the caramelized onions, which they still ate. 
        This is like bbq chicken pizza, but the starch in the form of pasta instead of pizza.  Got the idea?  Okay. We had some steamed garlicky broccoli on the side, and fresh baked bread, and dinner was served.
        I had to modify it quite a bit because I am cooking for 6, and need big meals.  Also, I wanted more of a mac and cheese base for mine... so I upped all of that cheesy goodness.  Breaking out of the mold here... something new!

        BBQ CHICKEN PASTA BAKE
        serves 6-8  adapted from: howsweeteats.com
        • 1 1/2-2 cups shredded chicken
        • 1 lb. cooked pasta (I used whole wheat shells)
        • 1/3 cup, plus more for top
        • 1 red onion, sliced
        • 1 tablespoon olive oil
        • 2 tablespoon butter
        • 3 tablespoon flour
        • 1 1/2 cup skim milk
        • 2-3 cups shredded cheese (I used sharp cheddar and smoked gouda blend)
        • 1/2-3/4 cup panko bread crumbs (I eyeballed it)

        Preheat oven to 350.  Cook pasta and shred chicken. In a small sauce pan, add 1 tablespoon olive oil and sliced red onions. season with salt and let caramelize, about 10-12 minutes.  During this time, combine shredded chicken with bbq sauce, tossing so it is completely covered. Once onions are caramelized, set aside.                                                                                                                            In a the same pan, over medium heat, melt butter and whisk in flour to create a roux. Cook for a 30 seconds to a minute to get rid of the raw taste of the flour.  Add skim milk and turn down to low heat. Whisk until slightly thickened and add 1/2 the cheese.  Stir until cheese is melted and mixture thickens, about 2-3 minutes.   
        In  a buttered casserole dish, dump pasta and add all but a little of the cheese sauce mixture and stir.  Sprinkle the onions over the pasta and the bbq chicken over that. Top with additional cheese sauce, remaining shredded cheese, BBQ sauce drizzles (don't be skimpy, I wished I had done more) and panko bread crumbs.
        Bake at 350 for 20-25 minutes.

        Friday, January 20, 2012

        Lasagna Soup


        Pinterest strikes again!  I saw this and it looked interesting.  I must admit, I was skeptical.  Could a soup really taste like lasagna?  This soup is outstanding!  It truly is like lasagna in soup form.  The cheesy goodness in the bottom makes it.  Really, you only need a dollop, and maybe an ounce of cheese.  A little goes a long way!  It was described as an Italian version of chicken tortilla soup, and that is a very good description really.  The cheese melts and even with just a little in my bowl, I had cheese in every bite. Y-U-M!!!

        I wanted to use sweet Italian sausage, but all they had at the store was hot.  It was just the right amount of heat for me.  If you or your family have a sensitive palette, you could substitute mild or sweet sausage and control the heat by adding red pepper flakes, which is in the original recipe anyway.  I omitted the red pepper flakes because I had hot sausage.

        This soup was really quick to throw together.  I cut the onion while the sausage cooked, got the garlic ready while the onion softened, opened the cans while the garlic cooked, etc.  Make sure to have some good bread to go along with it.  We really love this soup!  I will definitely be making it again!


        LASAGNA SOUP
        slightly adapted from:  afarmgirlsdabbles.com

        for the soup:
        • 2 tsp. olive oil
        • 1-1/2 lbs. Hot Italian turkey sausage
        • 2 large sweet onions, chopped
        • 6-7 garlic cloves, minced
        • 2 tsp. dried oregano
        • 3 oz.(1/2 small can) tomato paste
        • 1 28-oz. can fire roasted diced tomatoes
        • 2 bay leaves
        • 6 c. chicken stock (1 1/2 boxes)
        • 8 oz. mafalda, campanelle or fusilli pasta
        • 1/2 c. finely chopped fresh basil leaves
        • salt and freshly ground black pepper, to taste
        for the cheesy yum:
        • 8 oz. ricotta
        • 1/2 c. grated Parmesan cheese (I used fresh grated)
        • 1/4 tsp. salt
        • pinch of freshly ground pepper
        • 2 c. shredded mozzarella cheese
        DIRECTIONS:

        Heat olive oil in a large pot over medium heat. Add sausage, breaking up into bite sized pieces, and brown for about 5 minutes. Add onions and cook until softened, about 6 minutes. Add garlic and oregano. Cook for 1 minute. Add tomato paste and stir well to incorporate. Cook for 3 to 4 minutes, or until the tomato paste turns a rusty brown color.
        Add diced tomatoes, bay leaves, and chicken stock. Stir to combine. Bring to a boil and then reduce heat and simmer for 30 minutes. Add uncooked pasta and cook until al dente. Do not over cook or let soup simmer for a long period of time at this point, as the pasta will get mushy and absorb all the soup broth. You may even want to consider cooking the noodles separately, and then adding some to individual bowls before ladling the soup over them. This would be an especially smart move if you are anticipating any leftovers. Right before serving, stir in the basil and season to taste with salt and freshly ground black pepper.
        While the pasta is cooking, prepare the cheesy yum. In a small bowl, combine the ricotta, Parmesan, salt, and pepper.
        To serve, place a dollop of the cheesy yum in each soup bowl, sprinkle some of the mozzarella on top and ladle the hot soup over the cheese.

        Friday, January 13, 2012

        Chicken Salsa Bake


        This may be the easiest meal I have ever made, but it is delicious!  I had to share because it is so simple and I know we all have nights where we scream for simple, quick, easy and delicious. You know, the nights where the husband calls and says he is going to be late, you have a pounding headache, and the 2 year old has himself intertwined in your legs saying, "Hold me!!!".  Oh wait, that's my night.  But I am sure you have yours! For even easier, keep some of the Uncle Ben's ready to eat rice in your pantry.  Pop in the microwave for 90 seconds and done.  Brace yourself for good food, and oh so easy! 

        CHICKEN SALSA BAKE

        INGREDIENTS:

        • 3-4 chicken breasts, halved in thickness
        • 1 1/2-2 cups salsa (I use store bought "fresh")
        • 1 1/2-2 cups shredded cheddar or mexican cheese
        • rice


        DIRECTIONS:

        Preheat oven to 350.  Place chicken in baking dish.  Top generously with salsa.  Bake for 20 minutes.   while baking prepare rice.  Remove from oven and top with cheese.  Place in oven and bake until cheese is melted and begins to brown.  Serve over rice.  Garnish with sour cream and fresh cilantro, if desired.

        Blueberry Muffins with Streusel Topping


        I love blueberries and I adore blueberry muffins.  This has been my go to blueberry muffin recipe for awhile because it produces a light delicious blueberry muffin without all the guilt.  It is moist and is very tender.  I have lots of other recipes to try that call for a stick of butter and or lots of oil, but I can't bring myself to make them, because I love these muffins and I love that I can have 2 of these, and not feel guilty about it! I also love the citrus note the lemon zest bring to these muffins.  Blueberries and lemon go fantastic together.  

        This is a great muffin, so I hope you try them!


        BLUEBERRY MUFFINS WITH STREUSEL TOPPING

        INGREDIENTS:
        • 1 cup sugar
        • 1 egg
        • 1 cup nonfat greek yogurt
        • 1- 4 oz. container of unsweetened applesauce *see directions
        • 1/4 cup canola oil
        • 1 tsp vanilla
        • 1 tsp lemon juice
        • 1 tsp lemon zest
        • 2 cups flour
        • 1 tsp baking soda
        • 2 tsp baking powder
        • 2 pinches of salt (about 1/2 tsp)
        • 1 1/2-2 cups of blueberries
        STREUSEL:
        • 3 1/2 TBSP cold butter
        • 3 TBSP sugar
        • 3 TBSP brown sugar
        • 1/3 flour
        DIRECTIONS:

        Preheat oven to 350.  *Line a small colander with paper towels or use a mesh one and put applesauce in it.  Let drain for 15 minutes with a bowl under it to get rid of some of the moisture (this will ensure it will bring moisture and not wetness to muffins).  Wash and drain blueberries.  Line muffin tins with paper liners or spray with non-stick cooking spray. 
        In a small bowl mix streusel ingredients until the butter bits are about the size of peas.  I use my fingers for this. Set aside.
        Whisk together sugar and lemon zest.  Add greek yogurt, vanilla, lemon juice, applesauce and oil.  After it drains, I dump the applesauce in a 1/2 cup measuring cup, and fill it the rest of the way with oil.  Whisk to combine well. In a separate bowl, whisk together flour, baking soda, baking powder and salt. Toss 1 TBSP of this with the blueberries.  Add the dry ingredients to wet and mix 10 times around the bowl.  Add all but 1/2 cup of the blueberries and mix just enough to incorporate the flour and blueberries.  Batter will be lumpy.  Do not overmix!


        Fill about 18 muffin cups about 2/3-3/4 full.  Place 3-4 blueberries in the tops of each, pushing down with fingers a bit.  Sprinkle with streusel topping.  Place in oven, turn heat up to 400 and bake 18-22 minutes.  If using silicone, they tend to take a longer than the metal tins.  Serve warm.  Makes about 18, and will keep 2-3 days in an airtight container-- if they last that long.

        Tuesday, January 10, 2012

        Potato Skins


        I didn't have any green onions.

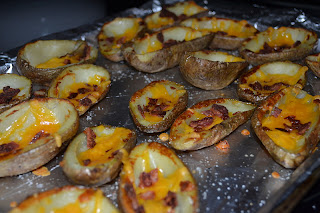
        There is a restaurant in North Syracuse named Zebb's that I adored as a kid.  They served vanilla or cherry coke and awesome salads.  I also loved their potato skins and would order them as a meal.  I have not had them in years and suddenly, I had to have them.  Must've been some female hormonal thing.  But, I don't live anywhere near central New York.  So, what's a girl to do?  Make them, of course!

        So glad I did.  So. . .Good.  Everyone in my family devoured them.  The salty skins and cool sour cream, and melted cheese,  there is not much better.  When I scooped out the insides, I had grand intentions of using the insides for baked potato soup, but my husband fed it to the boys for dinner the next night while I was out for a bit.  Oh well...  Anyway, these are so worth the time! Enjoy!

        POTATO SKINS

        INGREDIENTS:

        • 10-12 small to medium sized russet baking potatoes
        • Olive oil
        • Canola oil or grapeseed oil
        • Kosher salt
        • Freshly ground pepper
        • 12 strips of bacon
        • 1 cup grated cheddar cheese
        • 1 cup sour cream or greek plain yogurt
        • 2 green onions, thinly sliced, including the greens of the onions

        DIRECTIONS:


        Scrub the potatoes clean, pierce the skin with a fork a few times and then rub with olive oil.  Bake in a 400°F oven for about an hour until the potatoes are cooked through and give a little when pressed.

        While the potatoes are cooking, cook the bacon strips in a frying pan on medium low heat for 10 to 15 minutes, or until crisp. Drain on paper towels. Let cool. Crumble.  I use turkey bacon and cook it in the microwave on a paper towel lined paper plate until it is very crisp, then crumble.


        Remove the potatoes from the oven and let cool enough to handle. Cut in half horizontally. Use a spoon to carefully scoop out the insides, reserving the scooped potatoes for another use, leaving about 1/4 of an inch of potato on the skin.

        Increase the heat of the oven to 450°F. Brush or rub grapeseed oil or canola oil (or another high smoke point oil) all over the potato skins, outside and in. Sprinkle with salt. Place on a baking rack in a roasting pan (don't use a cookie sheet, it will warp, use a roasting pan or broiler pan that can take the heat). Cook for 10 minutes on one side, then flip the skins over and cook for another 10 minutes. Remove from oven and let cool enough to handle.


        Arrange the potato skins skin-side down on the roasting pan or rack. Sprinkle the insides with freshly ground black pepper, cheddar cheese, and crumbled bacon. Return to the oven. Broil for an additional 2 minutes, or until the cheese is bubbly. Remove from oven. Use tongs to place skins on a serving plate. Add a dollop of sour cream to each skin, sprinkle with green onions.

        Serve immediately. Serves 6. (We ate them cold too!)

        Cherry Almond Cake


        This cake is a sure hit.  It is absolutely delicious!  My mom got the recipe from a long time friend and gave me the recipe.  She and I both have always gotten rave reviews!  The almond flavor mixed with the fruit filling is so good.  I have had it for breakfast with coffee too.
        A few notes on it.  It does not do well in a stone pan.  It doesn't cook evenly or something.  It really needs a metal pan to be evenly cooked.  Also, don't overbake, because the outside pieces get dry.  I did it in my pampered chef baker the first time I made it and undercooked it a little and I had brought it to a potluck.  I was mortified that it wasn't cooked through and cake-like all the way through.  I got tons of compliments and people telling me they loved my "cobbler."  So, no worries if it is a little soft when you cut into it.  Also, it keeps great for several days!

        CHERRY ALMOND CAKE
        recipe from: Theresa Jackson

        INGREDIENTS:
        • 1 1/2 cups sugar
        • 1 cup butter
        • 1 tsp vanilla
        • 2 tsp almond extract
        • 4 eggs
        • 3 cups flour
        • 1 1/2 tsp baking powder
        • 1 can cherry pie filling (I buy the extra cherry variety)
        For glaze:
        • 1 cup powdered sugar
        • 2-3 TBSP milk
        • 1 tsp almond extract
        DIRECTIONS:

        Preheat oven to 350.  Grease a metal 9x13 pan.  Mix butter, sugar, vanilla, almond extract and eggs for 3 minutes.  Whisk together flour and baking powder.  Add to butter mixture and mix until incorporated.  Pour 2/3 of cake batter into the prepared pan.  Spoon cherry pie filling over the batter evenly.  Spoon remaining batter over the cherry pie filling.  Bake for 40-45 minutes (I do 45).  Let cool for at least 30 minutes before drizzling with glaze.  For the glaze, add enough milk so it drizzles off the spoon but not so much it is watery.  You want it a bit thick.  Drizzle over cake.

        Chicken Sweet Potato Stew


        I am so behind in my blogging.  I haven't stopped cooking/baking, but have been so busy from our travels, and Christmas and kids, that I just haven't gotten to it.  I am trying to get my house back in order from undecorating from Christmas, and we just had our family Christmas on the 7th because of our travels.  So, now I need to get back onto food!
        This dish was so hearty and delicious, not to mentioned filled our home with an amazing fragrance.  It was cozy, filling, and even figure friendly.  And easy!  I did it all in my dutch oven (stove to oven), and my rice cooker.  My husband was raving about it and in my daughters words, "It doesn't look very good, but it sure smells good and tasted good!"  I personally loved all the color.  The sweet potatoes break down some and flavor the broth/gravy making it slightly sweet and thick.  And the chicken is so tender!  We served it over brown jasmine rice.  Will definitely be making this one again!

        CHICKEN SWEET POTATO STEW
        adapted from: http://allrecipes.com

        INGREDIENTS:

        • 2 TBSP olive oil
        • 1 large onion, finely chopped
        • 2-3 clove garlic, chopped
        • 2 med-large sweet potatoes, peeled and diced
        • 2 carrots, diced (I used baby, about 1.5 cups)
        • 3 skinless, boneless chicken breast halves - diced
        • salt and pepper
        • 2-3 TBSP all-purpose flour
        • 1 cup dry white wine
        • 3 cups chicken stock (I used broth)
        •  3 sprigs of fresh thyme or 1 tsp dry
        • 1/4 cup half-and-half or light cream (I skipped to make it lighter)

        DIRECTIONS:

        Preheat the oven to 400 degrees F (200 degrees C).  Heat the oil in a large skillet over medium heat. Add the onion, and cook until just starting to turn golden. Mix in the sweet potatoes and carrot; cook and stir for a few minutes, until lightly browned. Add the garlic and cook another minute.
        Move the vegetables to the sides of the pan, or to one side to make a clear area for the chicken. Add the chicken; season with salt and pepper (about 1 tsp salt) cook and stir until seared on all sides. Scatter the flour over the top, and stir it in. Gradually stir in the chicken stock, mixing carefully so that no flour lumps form. Scrape any bits of food from the bottom of the pan while you do this. Add sprigs of fresh thyme and the wine, and mix through. Transfer to a casserole dish, and cover with a lid.
        Bake for 1 hour in the preheated oven. Remove from the oven, remove sticks from thyme and let it cool just a little before stirring in the cream (or else it may curdle). I skipped the cream.  Serve over rice.

        Thursday, January 5, 2012

        Oreo Truffles


         I had these a few years ago for the first time.  My favorite are dipped in white chocolate (even though I am not a huge white chocolate fan) topped with peppermint pieces.  The combination had me craving them!  These are so simple and so yummy.  I saw a recipe that used nutella in place of some of the cream cheese, which I will be trying at some point!  Anyway, these are awesome and easy! 


        OREO TRUFFLES
        • 1 package Double Stuffed Oreos  
        • 4 oz. cream cheese, softened (you can use up to 8 oz., based on consistency you like better)
        • Dipping chocolate (or 1 cup choc. chip with a few tsp shortening)
        Chop Oreos up finely in a food processor.  Save some of the finely crushed Oreos for garnish later and set it aside.  You don't need too much.
        With hands (or a spoon, I just think hands are faster), mash softened cream cheese and crushed Oreos until well combined.
        Roll into 1" balls and place on a wax covered cookie sheet. Put in freezer for 15 minutes.
        While balls are in freezer, melt chocolate according to directions.
        Pull the Oreo Truffles out of freezer, and dip into chocolate.  Garnish with reserved Oreo crumbs or crushed peppermint candy, before the chocolate sets up.
        Let chocolate set, refrigerate and enjoy!